
In the previous posts I laid the foundation to explain how I am using Zero Trust Network Access (ZTNA) to solve my remote access problem as well as talked about the importance DNS plays in this equation. In this post, I am going to start to get into the details about how I have designed my implementation. The main focus of this article will be to detail the configuration of the functionality that gives the Fortinet solution the ability to profile an endpoint and confirm its security posture up to the minute.
High Level Description
The Fortinet components that are needed to implement this functionality are the following:
- FortiGate
- FortiClientEMS
- FortiClient
I created a high level diagram that illustrates how these components are connected together.
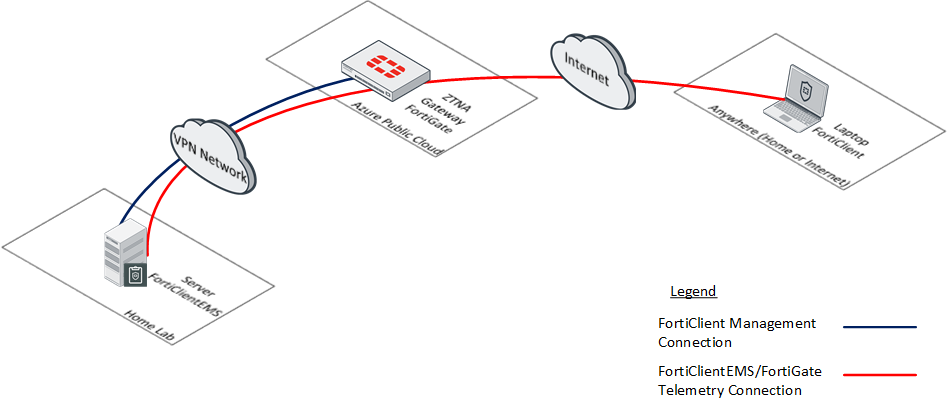
Note that there is an assumption that network connectivity is established between these different components. It is beyond the scope of this article to discuss the methods using for establishing connectivity.
Each component has a specific function that contributes to the sharing of this telemetry information. The next section will provide a bit more detailed information about the role each component plays.
FortiGate
In this design, the FortiGate primarily serves as the ZTNA Gateway which allows properly authenticated hosts to access resources behind the FortiGate. For this function, it also provide public access to the FortiClientEMS so that my FortiClient can successfully register into FortiClientEMS for management and sharing telemetry.
Network Connectivity
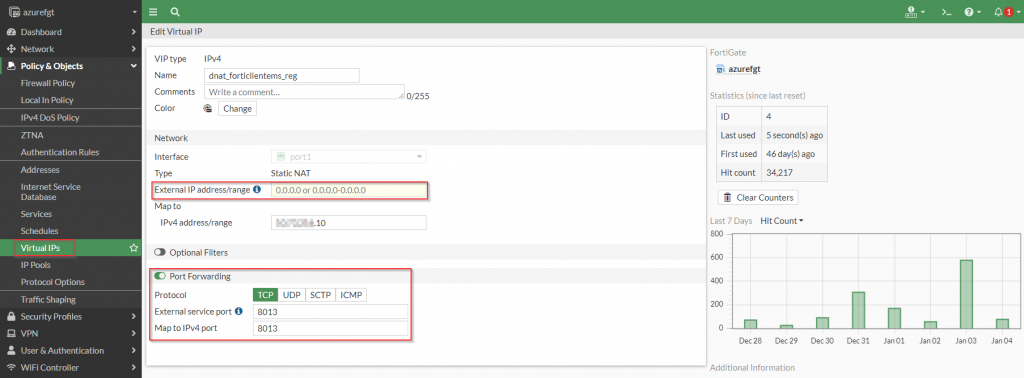
This access is facilitated through the use of a FortiGate Virtual IP (VIP) allowing traffic destined to the public IP address of the FortiGate to be forwarded to the backend FortiClientEMS server as long as it matches the standard port used for FortiClientEMS management (TCP/8013).
Here are the corresponding policies from my FortiGate to illustrate this configuration:
config firewall vip
    edit "dnat_forticlientems_reg"
        set uuid d9842eac-514b-51ec-0e41-6752dab8dbf4
        set mappedip "X.Y.Z.10"
        set extintf "port1"
        set portforward enable
        set extport 8013
        set mappedport 8013
    next
end
Figure 3. – CLI for VIP configuration for FortiClient Registration into FortiClientEMS
config firewall policy
    edit 6
        set name "Inbound FortiClientEMS Registration"
        set uuid 04c579c2-514c-51ec-3002-ec0457520528
        set srcintf "port1"
        set dstintf "az_dyn_vpn"
        set action accept
        set srcaddr "all"
        set dstaddr "dnat_forticlientems_reg"
        set schedule "always"
        set service "FCT-Registration"
        set utm-status enable
        set ssl-ssh-profile "certificate-inspection"
        set ips-sensor "default"
        set application-list "default"
        set nat enable
    next
end
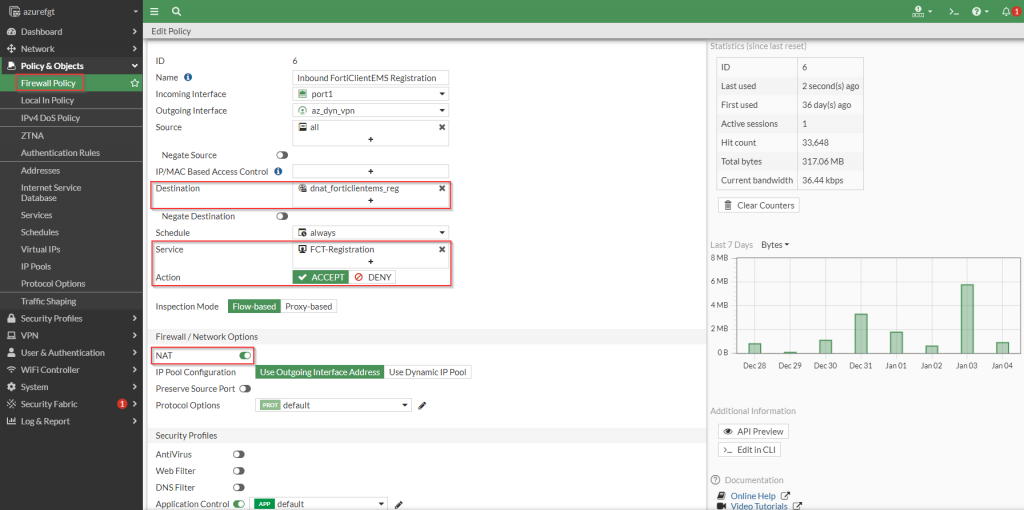
Figure 5. – CLI configuration of firewall policy for the FortiClient Registration into FortiClientEMS
It is important to note that this connectivity allows connectivity from any FortiClient over the Internet. Other precautions (such as enabling “Enforce invitation-only registration”) can be enabled on the FortiClientEMS server to only allow specific FortiClients to register
Fabric Connectivity
In order for the FortiGate to be aware of the telemetry from the FortiClients, a security fabric connection needs to be established between the FortiGate and the FortiClientEMS. To complete this, the FortiClientEMS needs to be set up. Below is a screenshot from the FortiGate showing the configuration needed for this establishment.
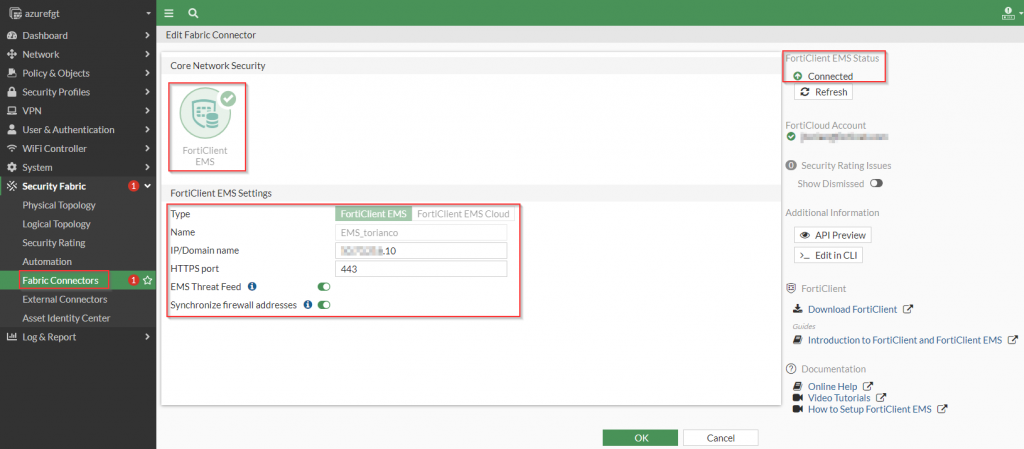
config endpoint-control fctems
    edit "EMS_torianco"
        set server "X.Y.Z.10"
        set capabilities fabric-auth silent-approval websocket websocket-malware push-ca-certs
    next
end
Figure 8. – CLI configuration of security fabric connection to FortiClientEMS
Once the access to establish connectivity for FortiClient to register to FortiClientEMS, the remaining steps can be completed on the other components.
FortiClientEMS
FortiClient Connectivity
FortiClientEMS primarily provides centralized management of all FortiClients. However, in the ZTNA use case, it is responsible for providing the telemetry from the FortiClients to the FortiGate via a tag. The FortiClients directly connect into the FortiClientEMS to provide this supporting information.
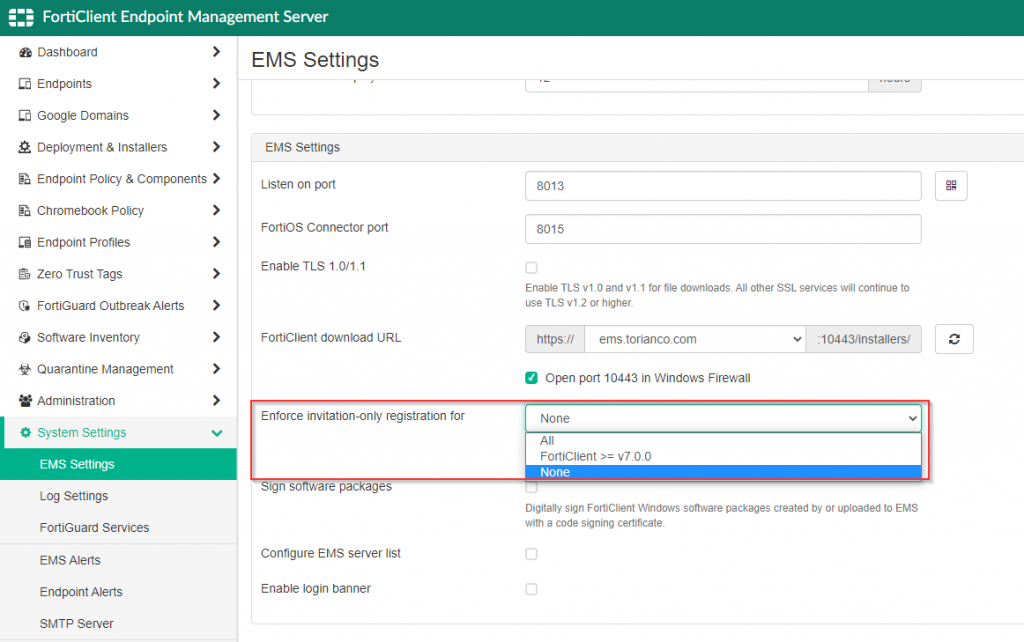
Here is a screenshot of some of the general settings used for accepting connections from the FortiClients.
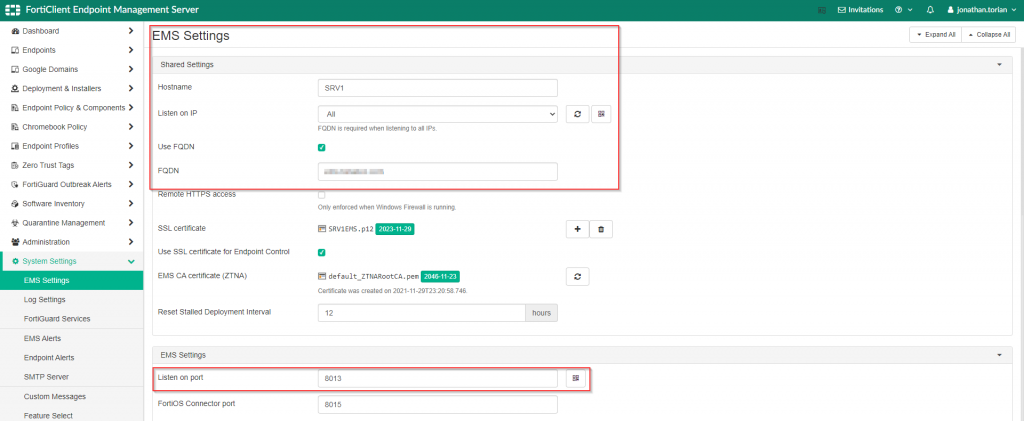
I would like to point out that I have assigned a certificate to my FortiClientEMS that was created by a Certificate Authority (CA) that is trusted by my FortiClient’s host. I have also specified the FQDN of the FortiClientEMS to reflect the entry that I specified in my public facing DNS registrar. There could be further tuning done, but the remaining default settings were sufficient to establish connectivity between the FortiClientEMS and the FortiClients.
FortiGate Connectivity
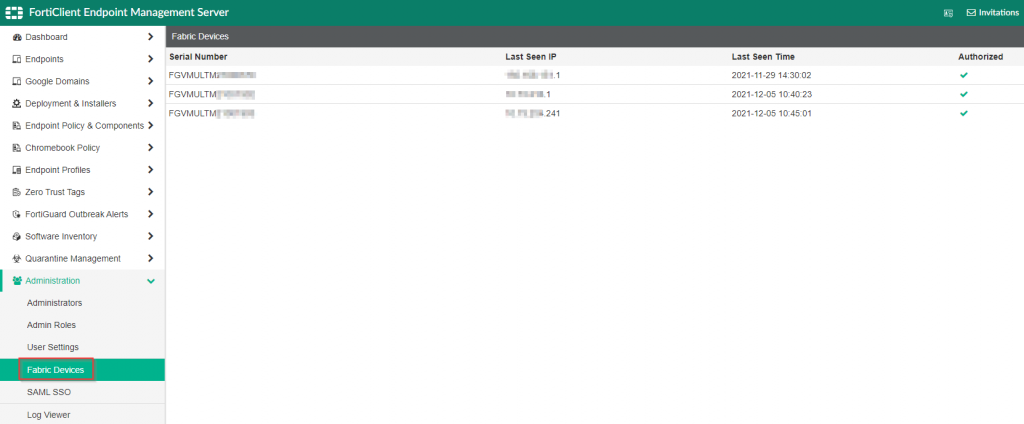
The default settings for the FortiClientEMS will allow the FortiGate to establish connectivity. However it is highly recommended that you assigned certificates assigned by a common trusted CA to establish proper trust between the two components. Once that trust has been established, the FortiGate must be authorized by the FortiClientEMS. Here is a screenshot of how this is configured in my environment:
FortiClient
The FortiClient is primarily responsible for providing the current posture of my machine to the FortiClientEMS. Once the FortiClientEMS receives this information, it references pre-configured “Zero Trust Tagging Rules” to decide how to assign a corresponding tag for the host. A particular host can have multiple tags assigned to it at the same time.
From the FortiClient perspective, all that is needed is for the Zero Trust Telemetry settings to be configured for the reachable domain name/IP address of the FortiClientEMS server. In my design, I am referencing a domain name in case the IP address that my FortiClientEMS server changes. Here is an example of where this is configured in my FortiClient:
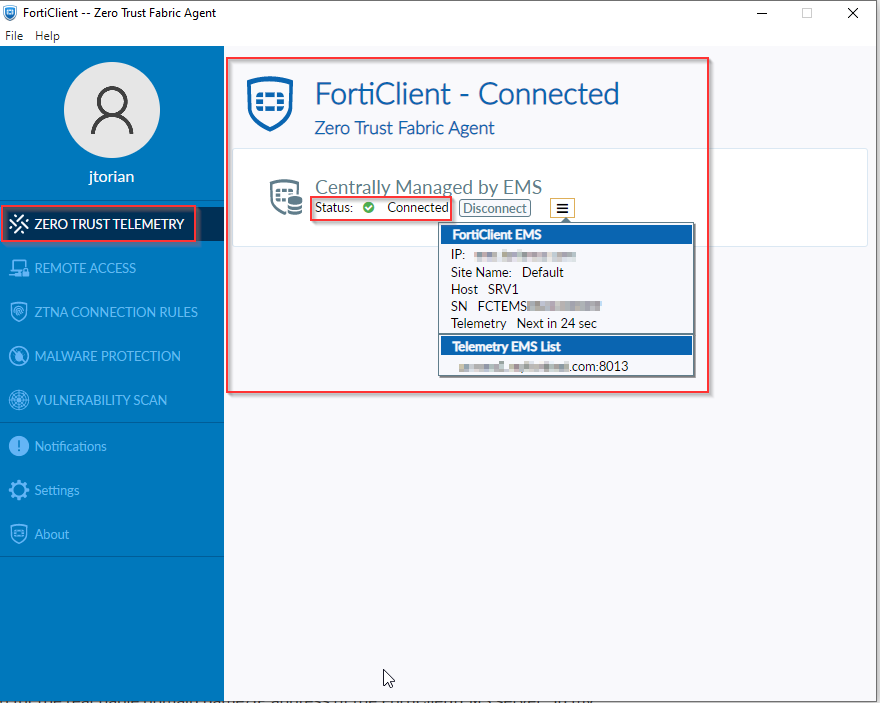
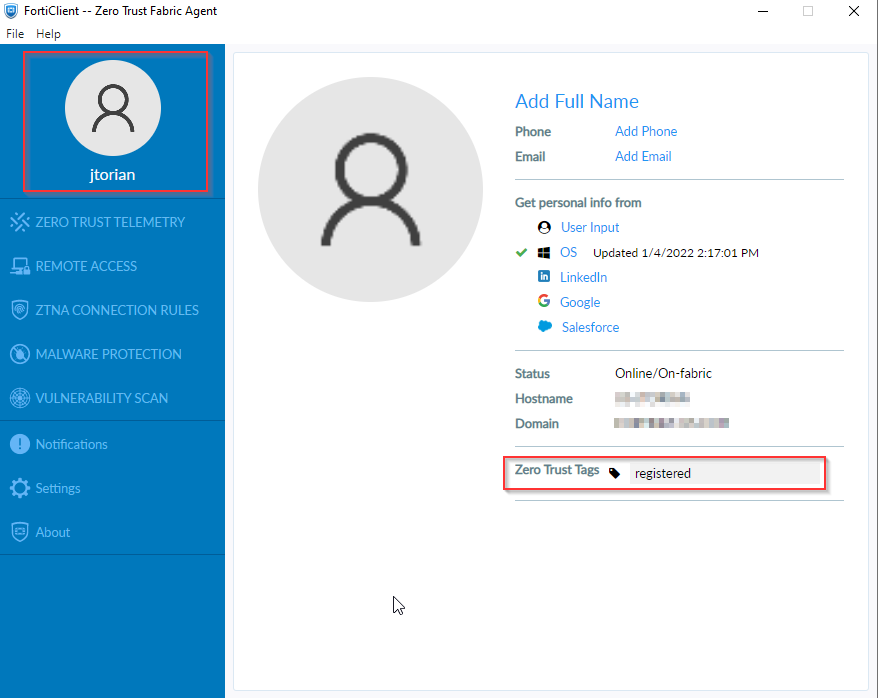
Once the FortiClient has established connectivity to the FortiClientEMS, it sends telemetry information every minute. This information is used by the FortiClientEMS to assign a “tag” to that endpoint to classify its current posture based on the pre-configured rules. If configured, this information is visible on the FortiClient under the user profile as shown in the following screenshot:
In the next post, I will cover the specifics on assigning tags to FortiClient endpoints to indicate their current state to the FortiGate. This information can be used by the FortiGate to determine whether access should be granted to the endpoint.
I hope this helps. As always, please feel free to leave a comment below to let me know your feedback.