
In the previous blog post, I covered setting up the basis of security with Zero Trust Network Access (ZTNA) through establishing telemetry. In this post, I cover how to configure the FortiGate as a reverse proxy to allow secured access to web applications.
The whole motivation of this project was to find a way to provide secure access to my lab equipment when demoing these products to prospective customers. In my use case, this is usually driven by accessing the web user interfaces of these products to show my customers how easy it is to configure these devices and the amount of information that is available to help them solve their network problems.
Although the Fortinet solutions are considered “hardened” against known vulnerabilities (assuming you keep them up to date), there is still the possibility for an unknown (or newly discovered) vulnerability to impact the correct operation of these products. In order to minimize this risk while still providing access to these devices, I chose not to expose them directly on the Internet (either by assigning public IP addresses to these devices or providing a virtual IP through my firewall).
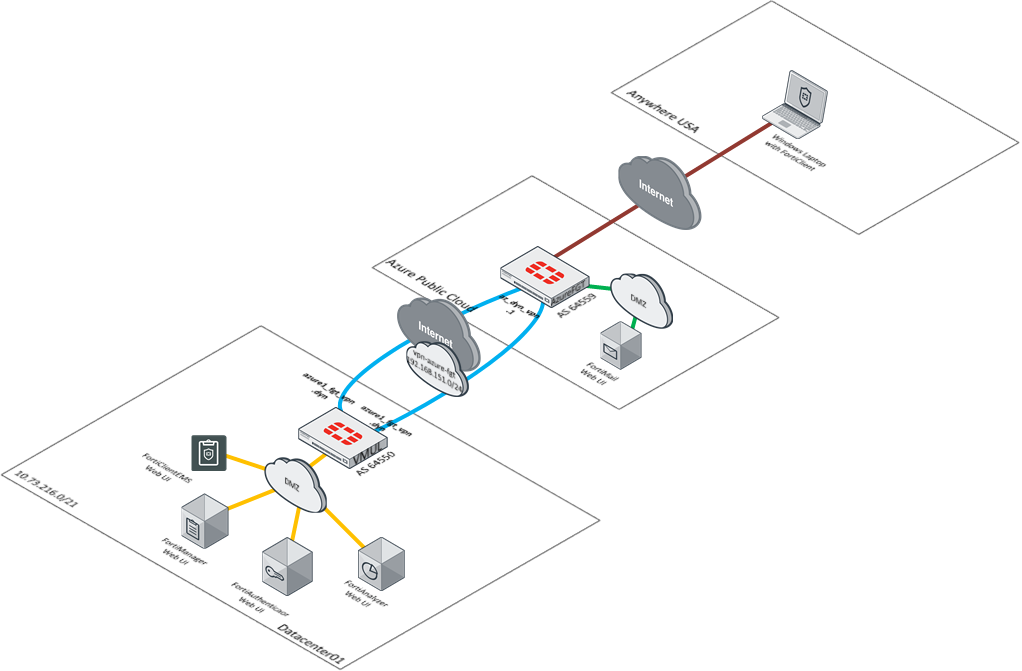
Instead I facilitate the access to these different components via a Virtual Private Network (VPN) established between my public cloud FortiGate and on-premise lab FortiGate. A diagram of this is shown below to illustrate this connectivity.
Given that I want to have an “always on” experience with higher awareness of the state of the machine connecting to these resources, I have gone through the steps below to configure the FortiGate to provide access to these different web interfaces.
Enable ZTNA Feature in FortiOS UI
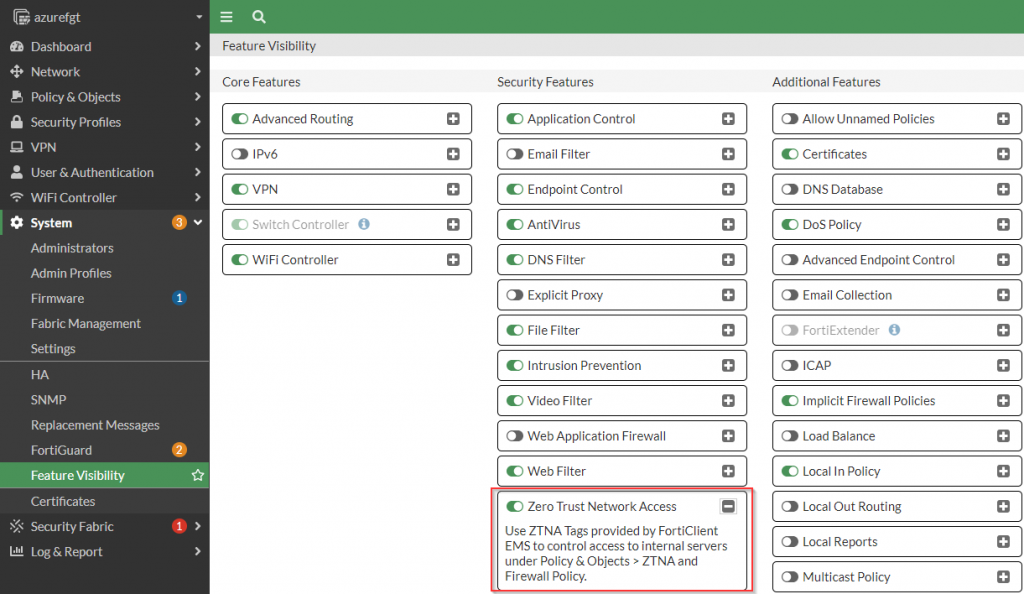
Before any of the Zero Trust Network Access components become available to be configured in the FortiOS Web UI, the “Zero Trust Network Access” feature needs to be enabled in the “System | Feature Visibility” section. A screenshot of where to enable this feature is listed below.
config system settings
    set gui-ztna enable
end
Figure 3. – CLI for enabling the ZTNA Feature in the FortiOS UI
Once this has been enabled, the components needed to complete the configuration become available in the FortiGate UI.
Configure ZTNA Servers
The first building block of providing access to the many different Fortinet applications is a ZTNA server. This object allows the definition of the public IP address these services will be accessible from, the certificate presented to the user when accessing these services as well as the service/server mapping. Here is a screenshot showing the complete configuration of my various Fortinet applications:
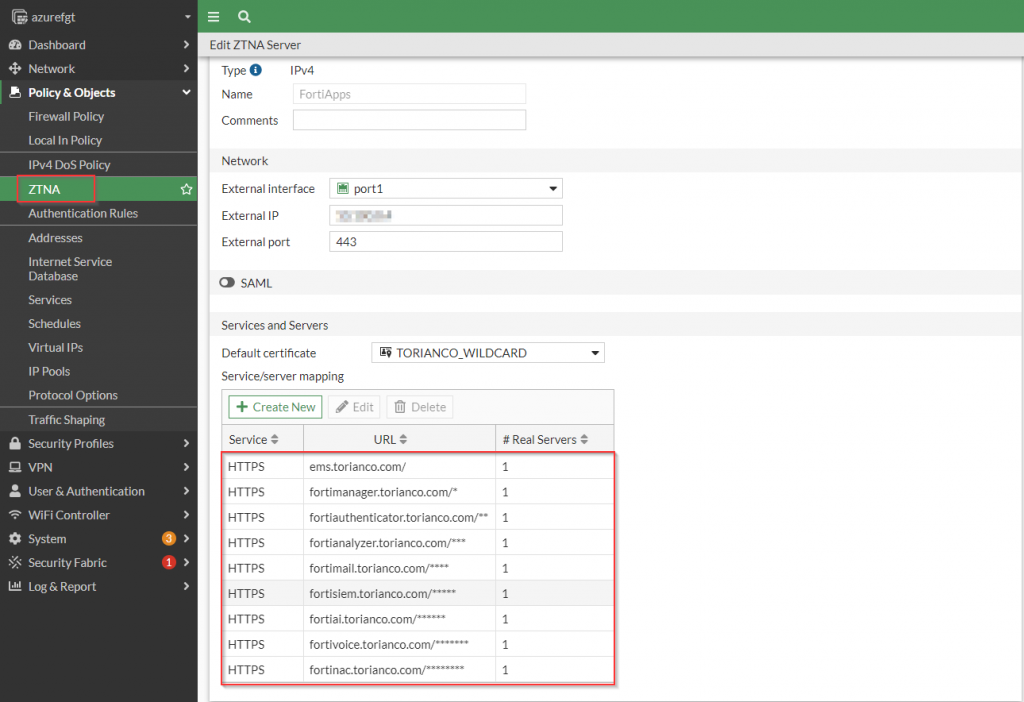
As shown in the screenshot above, it is important to define the “External IP” (and not use 0.0.0.0). In addition to that, it is a best practice to use a wildcard certificate as the “default certificate” in the event that all of your services belong to the same root domain name. Lastly, you can configure SAML to prompt authentication prior to access but for simplicity sake, I chose not to go this route.
Once the general ZTNA Server settings have been defined, the Service/Server mapping should be defined to instruct the FortiGate how to route the traffic based on the domain it receives as part of the request.
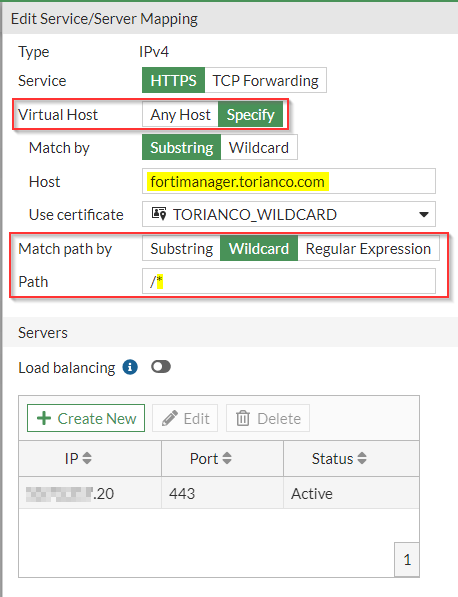
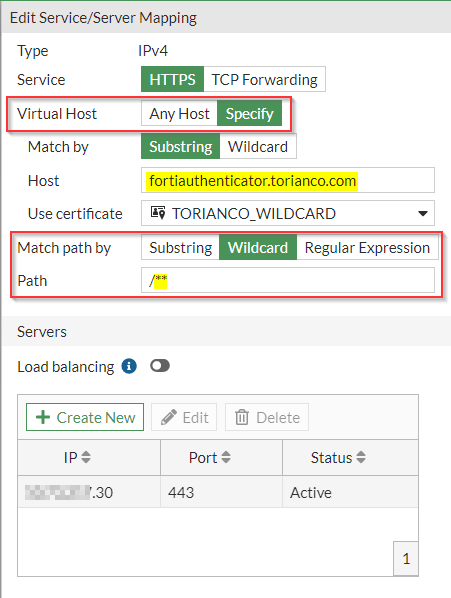
Service/Server Mapping
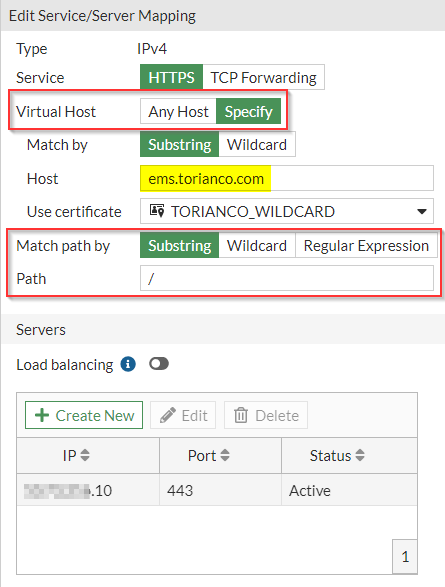
In each of the Service/Server Mappings, there are detailed configurations that instruct the FortiGate which backend server to grant access to based on the HTTP URI request from the client. Here are screenshots of a few of different service/server mappings:
config firewall vip
    edit "FortiApps"
        set type access-proxy
        set extip A.B.C.D
        set extintf "port1"
        set server-type https
        set extport 443
        set ssl-certificate "TORIANCO_WILDCARD"
    next
end
config firewall access-proxy-virtual-host
    edit "auto-FortiApps-1"
        set ssl-certificate "TORIANCO_WILDCARD"
        set host "ems.torianco.com"
    next
    edit "auto-FortiApps-2"
        set ssl-certificate "TORIANCO_WILDCARD"
        set host "fortimanager.torianco.com"
    next
    edit "auto-FortiApps-3"
        set ssl-certificate "TORIANCO_WILDCARD"
        set host "fortiauthenticator.torianco.com"
    next
end
config firewall access-proxy
    edit "FortiApps"
        set vip "FortiApps"
        set client-cert enable
        config api-gateway
            edit 1
                set virtual-host "auto-FortiApps-1"
                config realservers
                    edit 1
                        set ip X.Y.Z.10
                    next
                end
            next
            edit 2
                set url-map "/*"
                set virtual-host "auto-FortiApps-2"
                set url-map-type wildcard
                config realservers
                    edit 1
                        set ip X.Y.Z.20
                    next
                end
            next
            edit 3
                set url-map "/**"
                set virtual-host "auto-FortiApps-3"
                set url-map-type wildcard
                config realservers
                    edit 1
                        set ip X.Y.Z.30
                    next
                end
            next
        end
    next
end
Figure 8. – CLI commands of definition of ZTNA Server and Service/Server mapping
Please note: On FortiOS 7.0.3, I encountered an issue where multiple service/server mappings could be defined although I used different virtual host for each mapping. I found a workaround to allow multiple domains to be specified within the same ZTNA server definition. I accomplished this through the use of “Wildcard” matching and adding more “*” definitions behind the “path” variable.
Please note: On FortiOS 7.0.3, I encountered an issue where multiple service/server mappings being defined in the FortiOS WebUI would cause the virtual host mappings to get misconfigured in the CLI. I found a workaround to this by performing the configuration of the ZTNA Server and Server/Service mappings via the CLI.
Once the ZTNA servers have been defined, an entry under the “ZTNA | ZTNA Servers” section should be shown similar to the following screenshot:

To provide the necessary access to these newly defined ZTNA Servers, I create a ZTNA rule.
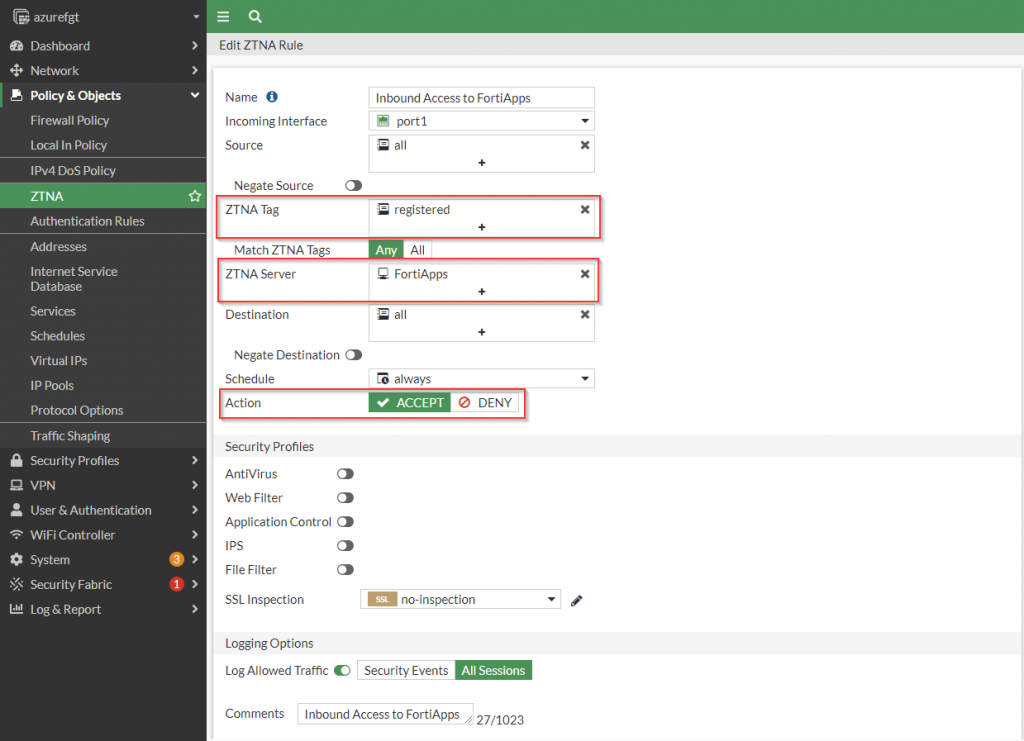
Configure ZTNA Rules
The second building block to facilitating access via ZTNA is the ZTNA rule. This allows the administrator to join the policy that defines the who, when and what should be able to access the resources behind the FortiGate. This should be very familiar to users of the FortiGate platform as it looks very similar to the definition of a standard firewall policy in FortiGate.
To provide access to my Fortinet applications, I create a rule that is reflected in the following screenshot:
config firewall proxy-policy
    edit 1
        set name "Inbound Access to FortiApps"
        set proxy access-proxy
        set access-proxy "FortiApps"
        set srcintf "port1"
        set srcaddr "all"
        set dstaddr "all"
        set ztna-ems-tag "FCTEMS0000000000_registered"
        set action accept
        set schedule "always"
        set logtraffic all
        set comments "Inbound Access to FortiApps"
    next
end
Figure 11 . – CLI commands of the ZTNA Rule providing access to “FortiApps” ZTNA Server
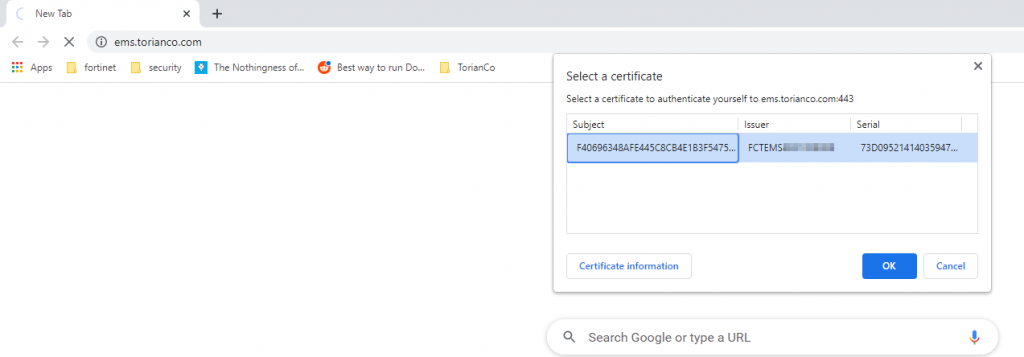
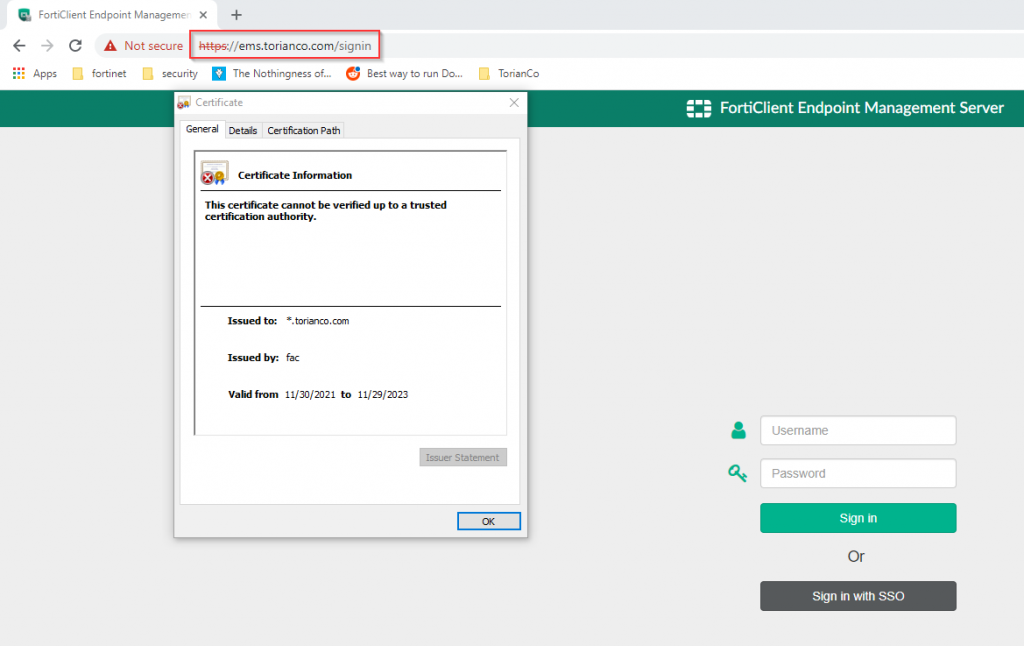
For basic connectivity establishment, I have just required that a FortiClient is registered to my FortiClientEMS installation. It is worth noting that no additional “Firewall Policy” needs to be defined to allow access to ZTNA protected resources. Here is an example showing connectivity to “https://ems.torianco.com”
In subsequent posts, I will explore creating more granular tags to enforce secure compliance when accessing these services, using TCP Forwarding to access non-HTTP resources via ZTNA and go under the hood about what is happening during the ZTNA validation process. I hope that this post was informative and as always, please let me know your thoughts in the comments below.
Hi Jonathan, thanks for the write-up. We typically use single server/single mapping profiles but are looking to consolidate some of these as per above. Fortinet’s documentation on the ZTNA function as far as multiple ZTNA servers/mappings is very poor and in fact your example above is not even covered. But the above is quite straight-forward. The issue we have is when adding SAML auth into the mix… The SP URLs include a hostname eg: entity id = https://host.name.com:9443/ztna/saml/metadata assertion url = https://host.name.com:9443/ztna/saml/login logout url = https://host.name.com:9443/ztna/saml/logout Consider that you can only attach 1 SAML auth object to a ZTNA server… Read more »