
In the previous blog post, I cover how the FortiGate provides secured access to web applications via its reverse proxy functionality in its Zero Trust Network Access (ZTNA) component. In this post, I cover how secured access can be provided to non-web applications through the TCP forwarding capabilities within this same component.
Many modern day applications are accessible via a web browser. I imagine this platform been adopted by developers because the software to access these applications is ubiquitous and available on many different platforms. However, there are still plenty of applications that are not web browser accessible and require the use of a separate non-web browser client to access the services.
In my particular use case, I need a mechanism that will allow me to run the native Windows remote desktop protocol application (mstsc.exe) from my laptop to connect to a jumpbox in my lab environment for testing. With this being a remote access tool, it is of paramount importance that the most secure configuration is applied to the hosts that are granted this access. Through the use of the Fortinet ZTNA functionality, I am able to achieve this goal.
Topology
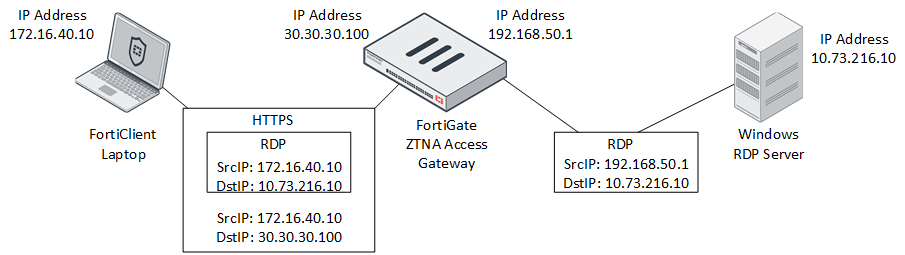
The topology for this is very similar to the topology defined when accessing web applications through the ZTNA functionality on the FortiGate. The major difference is that from my host, I access the non web application via the local IP address assigned to that server (similar to accessing through a VPN client). The diagram below illustrates this connectivity:

To facilitate this communication, I configure a special kind of ZTNA server that supports TCP Forwarding.
TCP Forwarding
Before getting into the nuts and bolts about configuration, I want to provide a brief explanation to how this functionality works. When a user needs secure access to a normal web application behind the FortiGate with ZTNA, there is no special translation of the underlying protocol between the user’s request and the web server’s response. Since it is all HTTP/HTTPS, the user can send that traffic in its native form and after the FortiGate performs its checks against that request, can forward that traffic to the web server for processing.
When a user needs secure access to a non-web application through ZTNA, a different process happens. I configure the FortiClient with a special redirection policy called a ZTNA Connection Rule. This rule intercepts traffic to a specific IP address and port from the host and defines a proxy gateway address and port that this traffic will be sent to for processing. When the specific connection is attempted from the client, the FortiClient intercepts that traffic and tunnels it in an HTTPS packet to the FortiGate (Proxy Gateway). After the FortiGate performs its validation against the client, it forwards that packet in its native state on to its destination. The diagram below illustrates this concept.
Please note: In the current implementation, only TCP is supported as a protocol that can be tunneled using this functionality. There is no support for UDP which may preclude use of applications that only use that protocol for transport.
The first step in enabling this functionality is to configure a TCP Forwarding ZTNA server on the FortiGate.
Configure a TCP Forwarding ZTNA Server
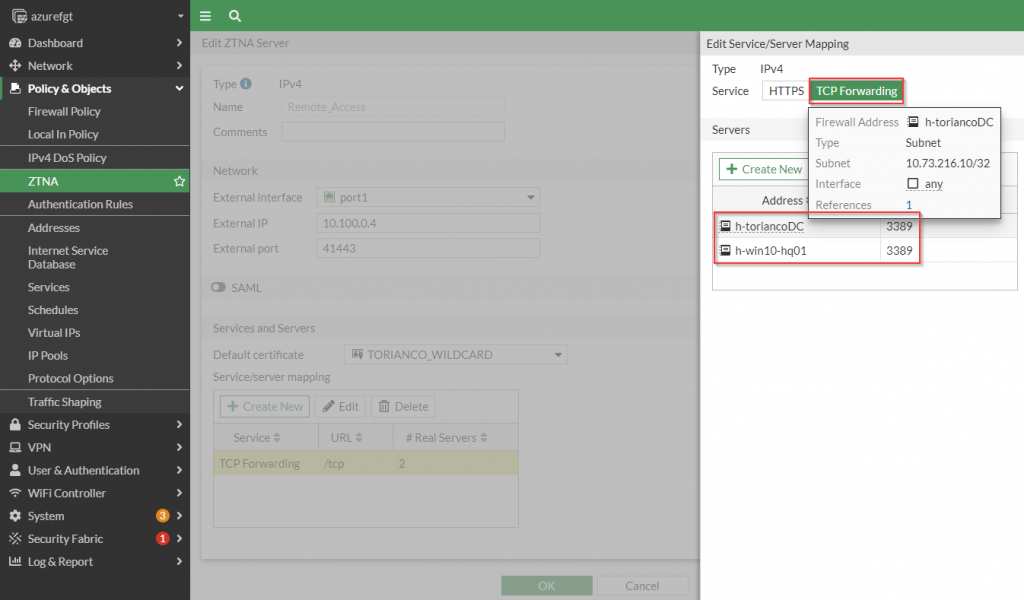
The creation of the ZTNA Server object used for TCP Forwarding is very similar to the creation of the HTTPS variant. It allows the definition of the public IP address and port these services will be accessible from, the certificate presented as well as the mapping of IP address and port the FortiGate will be forwarding to. Here is a screenshot of the base configuration for the TCP Forwarding ZTNA Server object:

It is import to define the External IP address and External port as the FortiGate uses this to assign the right forwarding rule based on these parameters. Once these options are configured, the Service/server mapping can be defined.
Defining the Service/server mapping
The Service/server mappings informs the FortiGate the destination of the traffic that arrives on the external IP address and external port from the secured client. Multiple applications can be mapped within a single service/server mapping. To illustrate this, see the following screenshot:
config firewall vip
    edit "Remote_Access"
        set type access-proxy
        set extip A.B.C.D
        set extintf "port1"
        set server-type https
        set extport 41443
        set ssl-certificate "TORIANCO_WILDCARD"
    next
end

config firewall access-proxy
    edit "Remote_Access"
        set vip "Remote_Access"
        set client-cert enable
        config api-gateway
            edit 1
                set url-map "/tcp"
                set service tcp-forwarding
                config realservers
                    edit 1
                        set address "h-toriancoDC"
                        set mappedport 3389
                    next
                    edit 2
                        set address "h-win10-hq01"
                        set mappedport 3389
                    next
                end
            next
        end
    next
end
Figure 5. – CLI commands of definition of ZTNA Server and Service/Server mapping
Please note: The address within the “Service/Server mapping” can only reference firewall objects. It is required to create an address object that references the specific IP the user will connect to.
Once the ZTNA servers have been defined, a corresponding entry under “ZTNA | ZTNA Servers” should be present as shown in the following screenshot:

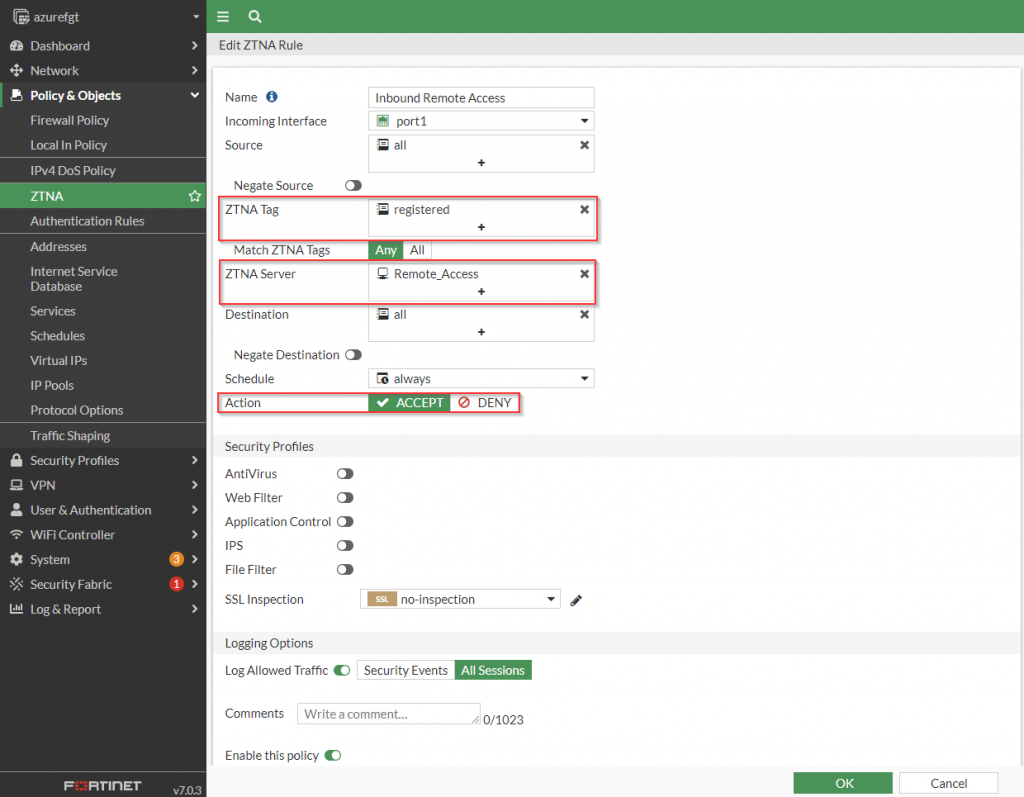
To provide the necessary access to this newly defined ZTNA server, I create a ZTNA rule.
Create ZTNA Rules
The creation of the ZTNA rule allows the administrator to join the policy that defines the who, when and what should be able to access the resources behind the FortiGate. To provide access to my Windows jumpbox via the native RDP client, I create a rule that reflects the following screenshot:
config firewall proxy-policy
    edit 2
        set name "Inbound Remote Access"
        set proxy access-proxy
        set access-proxy "Remote_Access"
        set srcintf "port1"
        set srcaddr "all"
        set dstaddr "all"
        set ztna-ems-tag "FCTEMS0000000000_registered"
        set action accept
        set schedule "always"
        set logtraffic all
    next
end
Figure 8. – CLI commands of ZTNA Rule allowing access to “Remote_Access” ZTNA Server
To allow connection from my endpoint to the jumpbox, I configure the FortiClient with the ZTNA Connections rules.
Configure FortiClient with ZTNA Connection Rules
The FortiClient intercepts traffic destined to the actual (private) IP address of my Windows jumpbox. In order for the FortiClient to know what traffic should be tunneled to my FortiGate ZTNA access gateway, I define ZTNA connection rules. Here are a couple of rules I define locally on the FortiClient:
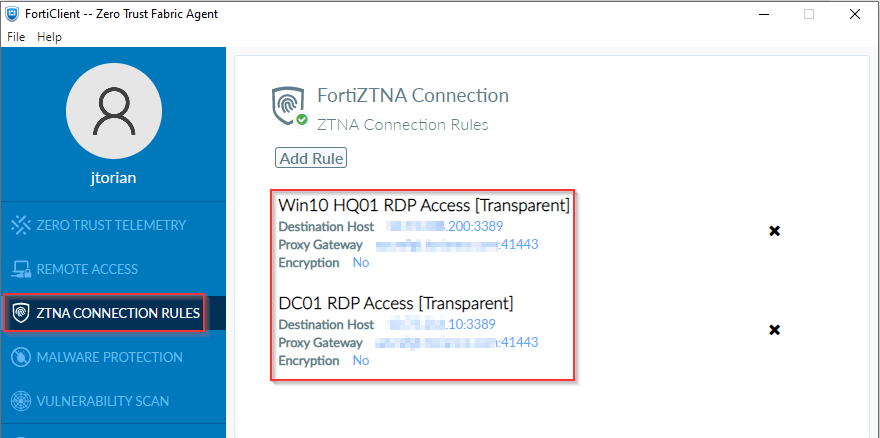
The destination host corresponds to the “Service/Server mapping” defined in the TCP Forwarding ZTNA Server object earlier in this article. The “Proxy Gateway” corresponds to the public IP address (or publically accessible FQDN) and port that the TCP Forwarding object is configured for. There is an option to support encryption for applications and services that are not encrypted end-to-end. However, since RDP does support encryption, I did not enable this option.
These settings are configured local to the FortiClient because there is not any support through the FortiClientEMS user interface (as of version 7.0.2). However, these rules can be deployed via the FortiClientEMS through the use of a custom XML as defined in Zero Trust Network Access section of the FortiClient XML Reference guide.
Validation
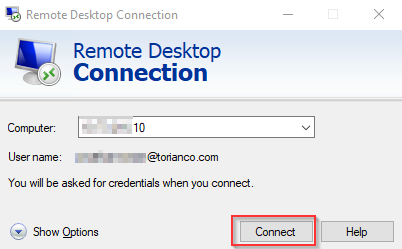
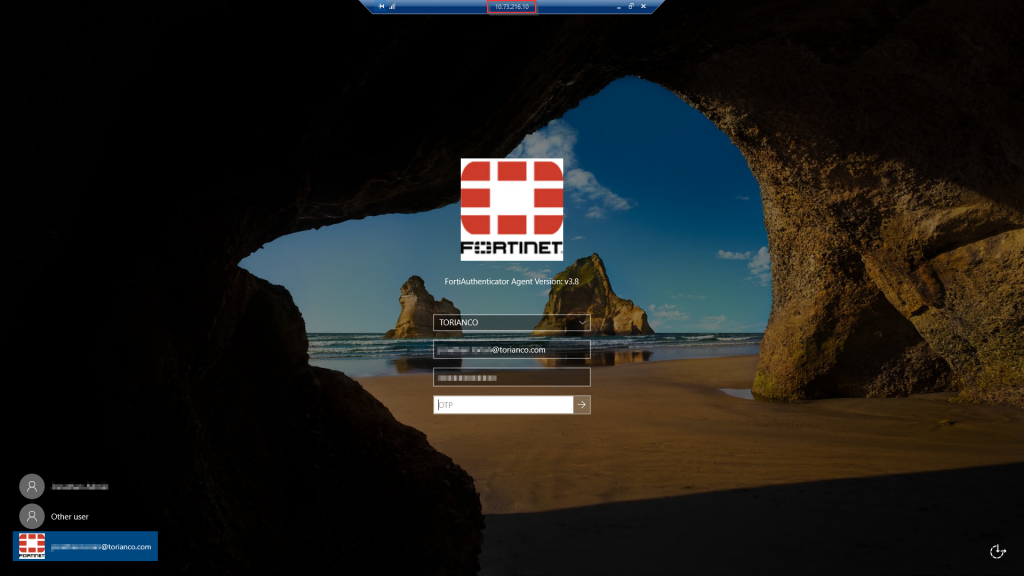
To confirm access, I open up the native RDP client and connect to the jumpbox similar as if I were routing to it directly on the same network.
As I draw down to conclude this series, the next posts will focus on the posturing functionality of this ZTNA solution and understanding how to debug this process if things do not work as planned. I hope this post was helpful and as always, please let me know your thoughts and feedback in the comments below.