
Okay, before I get into the details of this article, I know I have written about Zero Trust Network Access (ZTNA) and how it is a better method to use for secure remote access. I still believe that, however I do acknowledge that in some cases, users may not have all of the components for ZTNA and may want other options for securing their remote access. I recently received two inquiries asking for guidance on how to leverage certificates with username and password. Funny enough, this was an feature enhancement I submitted earlier in my career and I am happy to learn that it was implemented at some point in time.
Importance of Two Factor Authentication
It is a security best practice to have multiple factors of authentication. Typically a factor of authentication boils down to one of the following:
- Something you know (password)
- Something you have (token or certificate)
- Something you are (biometric [fingerprint or face scan])
The vast majority of users use a password to secure their access to their resources. The problem with this is that many users choose an insecure password and leverage the same password for a long period of time. This makes their remote access susceptible to malicious users to compromise their accounts and access their resources from any machine. To combat this and subsequently only allow access from the user’s machine, an additional factor of leveraging a certificate can be required by their remote access solution. Hence the name, two factor because now the solution requires something the user knows (password) and something the user has (a certificate on the machine).
Certificates
There are plenty of primers online about X.509 and how certificate authentication works. It is beyond the scope of this article to go into the details about this, but hopefully one can infer its primary concepts from its usage in this guide. With this understanding, the following assumptions are being made about the existing infrastructure:
- A root certificate authority is already present in the environment
- The user has a properly defined certificate assigned to it from the root certificate authority
- That user certificate has both the private and public key installed on the endpoint
- There is an existing active directory infrastructure in place
- The FortiGate has been configured for SSLVPN with access to a basic tunnel
- The FortiClient has been installed on the endpoint machine
Endpoint Certificate Configuration
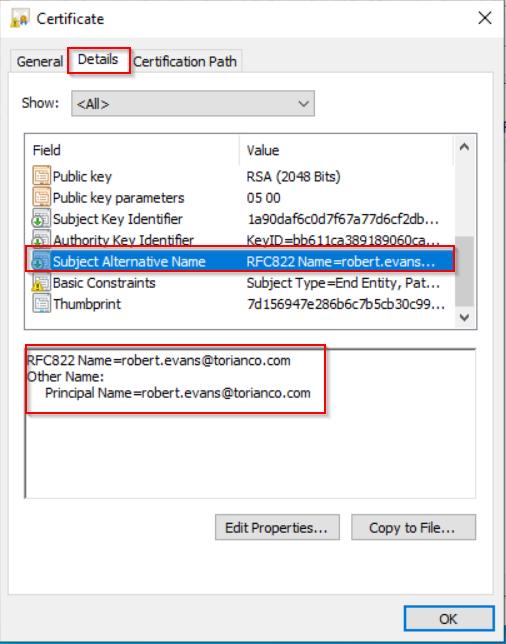
As mentioned in the assumptions above, the endpoint must have a properly configured certificate to present to the FortiGate for validation. Beyond the certificate being properly defined, the most important characteristic of the certificate is that the Subject Alternative Name (SAN) must have the user principal name (UPN) match that of the UPN that is defined in Active Directory. This can be validated on a Windows 10 Desktop by using the Microsoft Management Console (MMC) | Certificate Snap-In as shown in the screenshot below:

To validate that the user has the proper UPN defined in the certificate, the details of the certificate can be viewed as shown in the screenshot shown below:
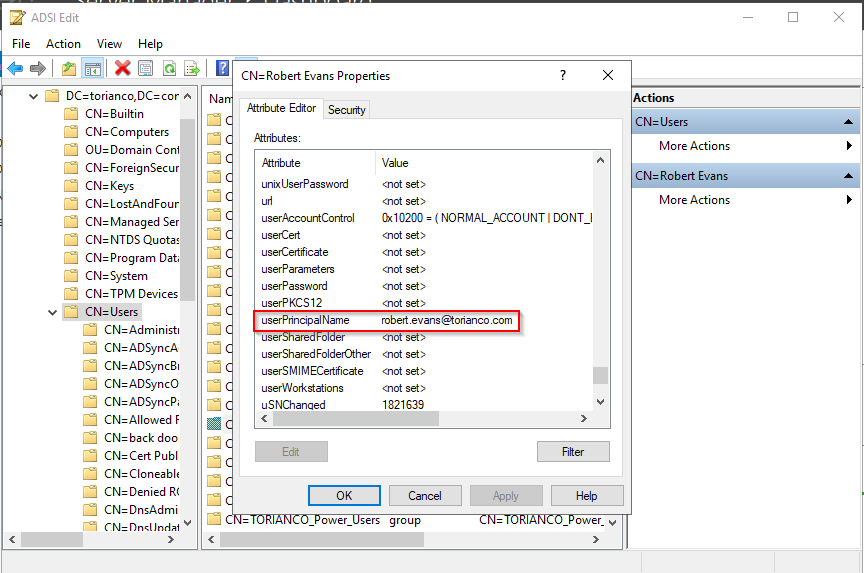
Pro-Tip: This UPN can be validated against the Active Directory Domain Controller by using the ADSI Edit tool to validate the LDAP attributes for the user that correspond to the UPN.
Please note: The FortiClient is not configured to perform mutual authentication against the SSL VPN Gateway (FortiGate) in this case. Due to this, the Windows 10 server does not have the certificate authorities to “trust” the certificate coming from the FortiGate. It is always a best practice to ensure there is mutual authentication between the client and server to ensure that there is a high confidence that the communication between the two hosts are not being intercepted or eavesdropped by an inline device.
FortiGate SSLVPN Configuration
Once the user has been configured to provide the correct certificate upon connecting, the FortiGate has to be configured to validate the presented certificate and subsequently validate the password being provided by the user to ensure it is authenticated via the defined authentication server (i.e. Domain Controller). To validate the certificate being provided from the end user, the proper certificate authorities must be installed on the FortiGate.
Installing the Certificate Authority Public Keys
The proper “chain of trust” must be established on the FortiGate. To ensure that this is the case, all root and subsequent intermediate certificate authorities must be installed on the FortiGate. Below is a screenshot showing the root and intermediate certificates installed on the FortiGate running the SSLVPN Gateway:
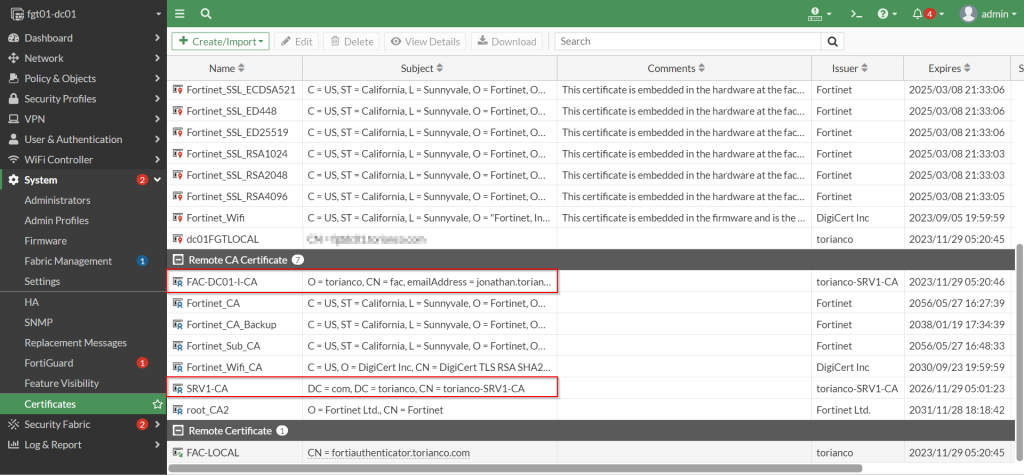
Once the necessary certificate authorities have been added to the Remote CA Certificate certificate store, a remote authentication policy needs to be configured to ensure that the FortiGate consults the active directory domain controller for the password of the user defined within the certificate.
Defining the Remote Authentication Server to Active Directory
The ability for the FortiGate to validate multiple factors of authentication from a particular user stems from the ability for the peer entry to be able to specify attributes within the certificate to match as well as a remote authentication server to query for authentication. The most common authentication server is Windows Active Directory and upon extracting the UPN from the certificate, the FortiGate must know how to query the domain controller with this information. Below is an example showing the a configuration that queries the domain controller leveraging the “userPrincipalName” as the common name identifier:
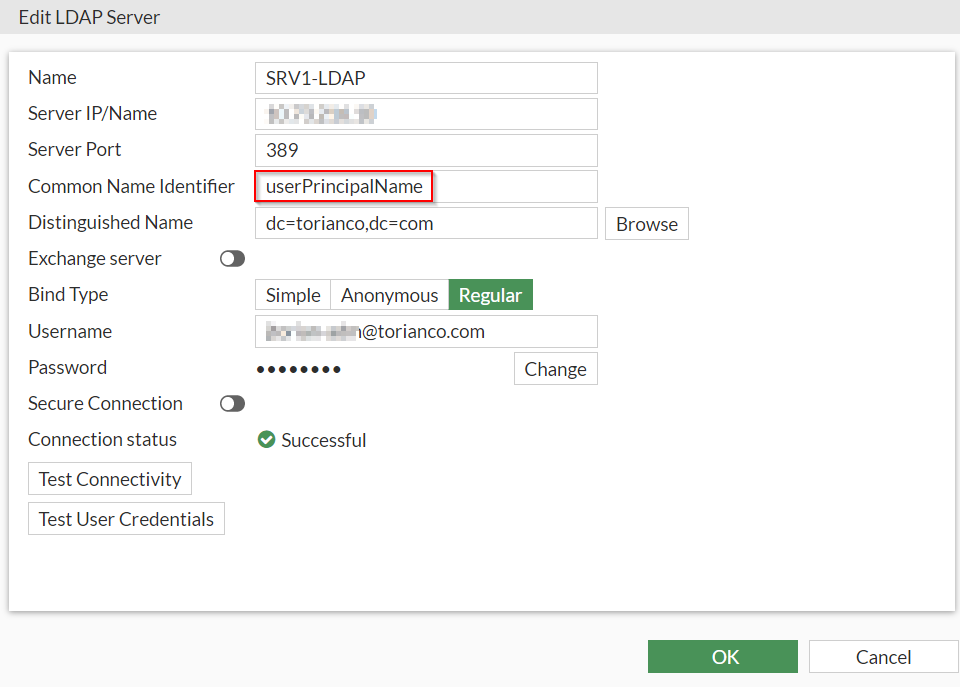
Please Note: It is a best practice to define secure LDAP communications between the FortiGate and the Windows Active Directory controller (typically over port TCP/636). Due to this being a lab and the FortiGate is on the same subnet as the domain controller it is not, but in a production environment, please use secured communications.
Once the remote authentication server has been defined, a firewall group referencing that server must be created. An example this is shown in the screenshot below:
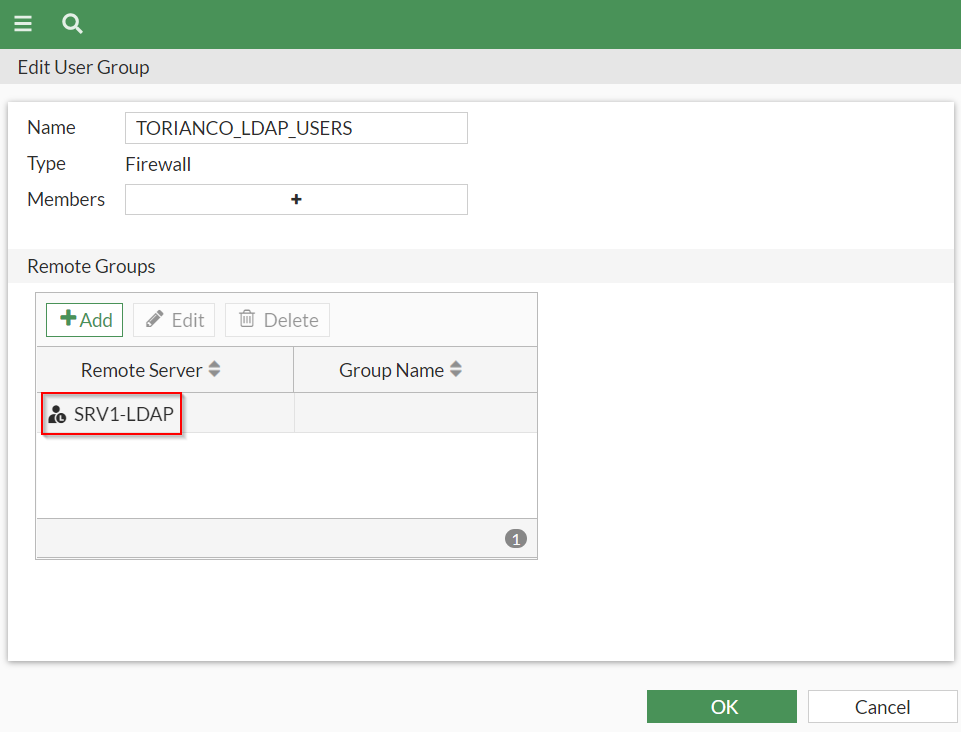
Pro-Tip: The “TORIANCO_LDAP_USERS” firewall group is currently configured to allow any user part of the Active Directory to be authenticated. At this stage, the FortiGate can be configured to limit access to who is validated by this group to a particular security group by defining it within the remote groups section.
Once the necessary remote authentication servers have been added, a corresponding “Public Key Infrastructure (PKI) Peer” can be defined to configure the FortiGate to validate users from particular CA and this remote authentication server.
Defining the Certificate User (PKI Peer)
The FortiGate must reference a PKI peer that has the characteristics defined for matching the certificate. In this case, the criteria for matching just needs to have a “certificate authority” defined and to tell the FortiGate to validate the users password via a referenced remote authentication server based on the UPN. This is defined in the command line interface (CLI) of the FortiGate using the following commands below:
config user peer
    edit "torianco_peers"
        set ca "FAC-DC01-I-CA"
        set ldap-server "SRV1-LDAP"
        set ldap-mode principal-name
    next
end
The final step on the FortiGate is to create an authentication rule on the FortiGate to require the connection attempt from the user to provide a certificate that is used for two-factor authentication.
Configuring the SSL VPN Authentication Rule
The FortiGate SSLVPN settings allow for an authentication rule to be defined which configures the SSLVPN gateway to require a certificate from the user authenticating to it. This can be accomplished leveraging the commands shown below:
config vpn ssl settings
    config authentication-rule
        edit 1
            set groups "TORIANCO_LDAP_USERS"
            set portal "torianco_sslvpn"
            set client-cert enable
            set user-peer "torianco_peers"
        next
    end
end
Below is a summary of the commands above:
- The remote group (“TORIANCO_LDAP_USERS”) referencing the remote authentication server is defined to authorize the users who are validated.
- The SSLVPN portal (“torianco_sslvpn”) that the user should be able to access once proper authentication and authorization has taken place.
- The “client-cert” enable configures the FortiGate to require a certificate when matching this particular authentication rule.
- The PKI User peer (“torianco_peers”) configures the FortiGate to perform authentication based on the matching criteria of the certificate and subsequently the password of the user who is extracted from the certificate.
Once the FortiGate configuration has been completed, the remaining configuration can be completed on the endpoint to allow the FortiClient to successfully connect to the FortiGate using the two-factors (certificate and username/password)
Endpoint FortiClient Configuration
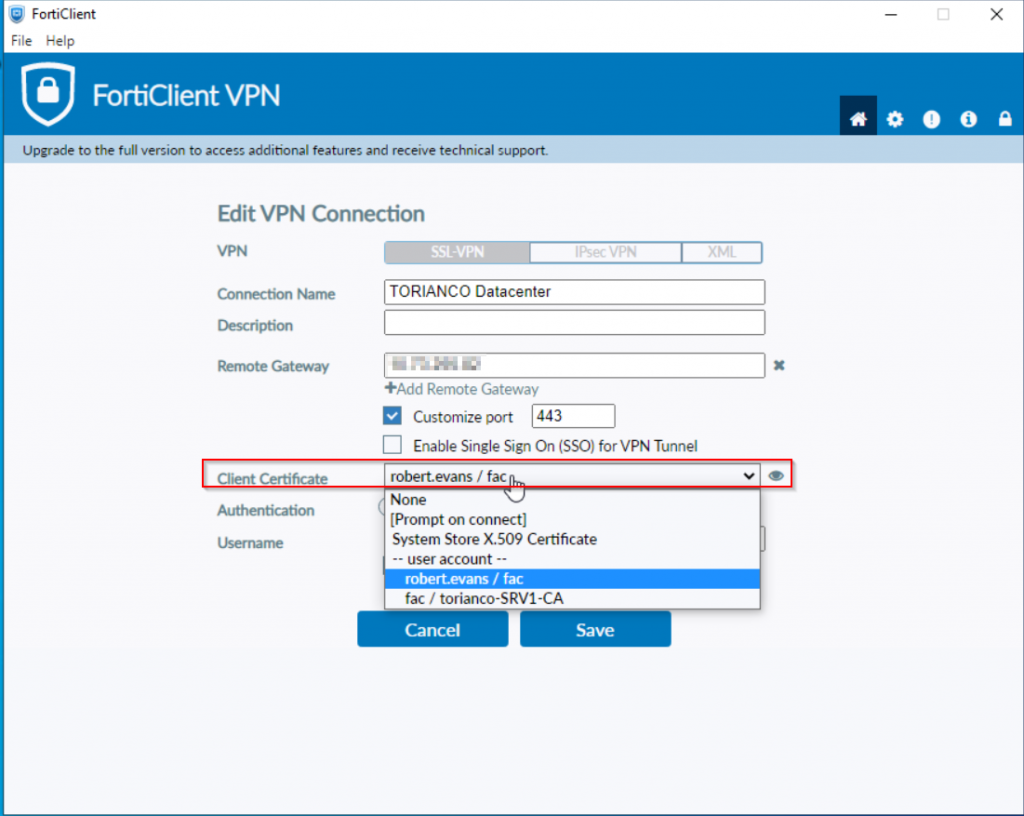
The FortiClient must be configured to present the certificate as part of its credentials when attempting to authenticate against the SSLVPN Gateway on the FortiGate. An example of this from the free FortiClient VPN software is shown in the screenshot below:
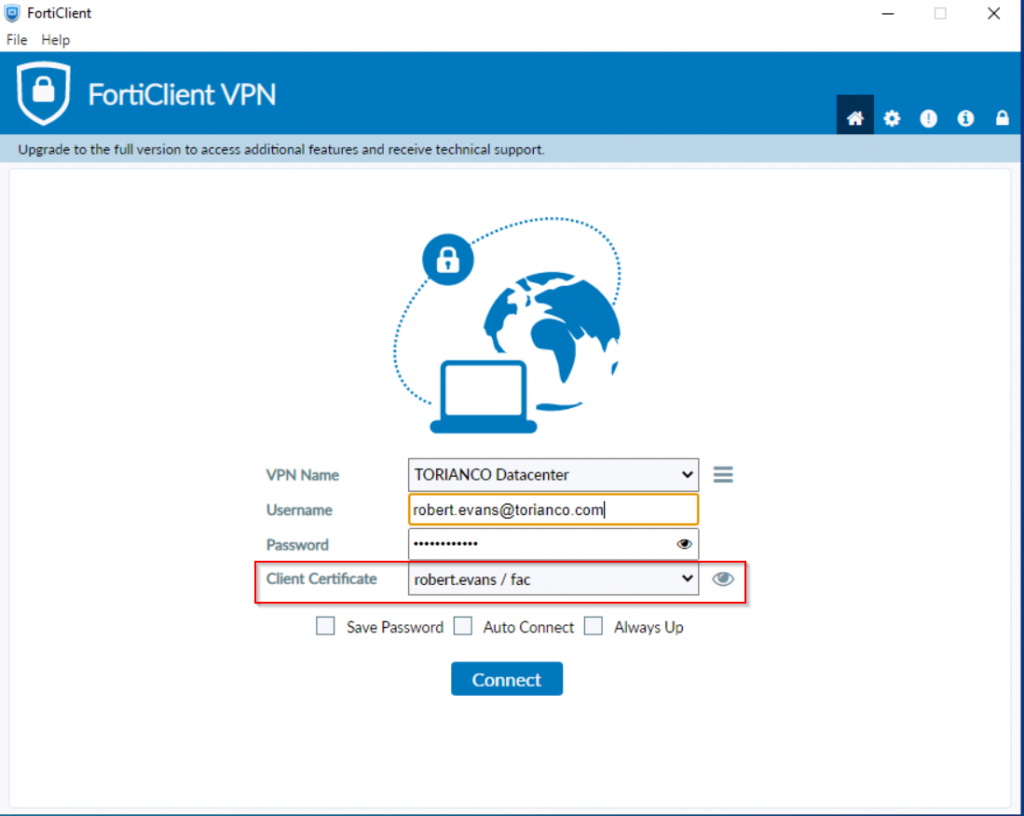
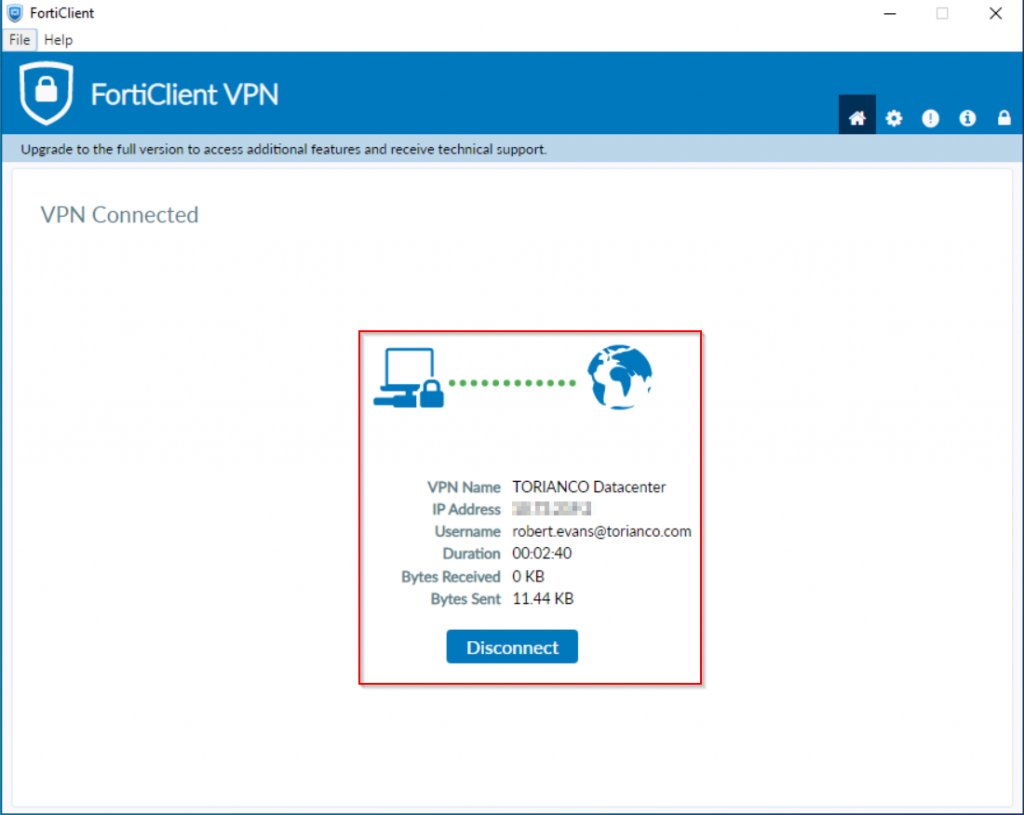
Once the FortiClient has been properly configured, the connection should be able to be established as shown in the screenshot below:
Hopefully this article can provide a little bit more clarification as to how to configure the FortiGate SSLVPN Gateway to use both the client certificate and password to authenticate a user with two factors of authentication. Please let me know your comments and thoughts about this article and as always, I hope this helps!