
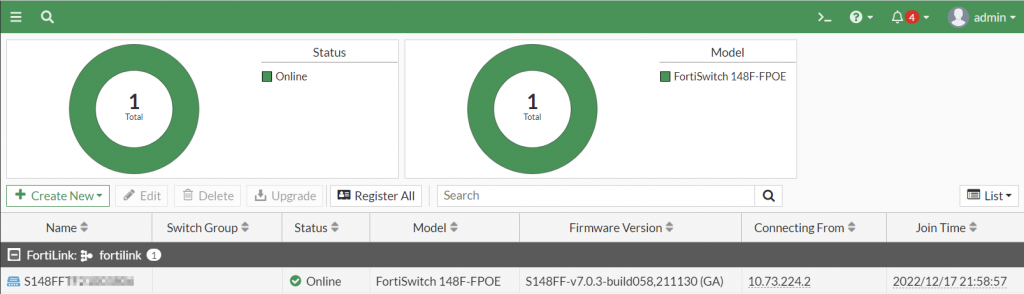
I was speaking to a colleague the other day about how great he thought FortiLink was. He was raving about the simplicity of the solution is to set up a group of FortiSwitches from the FortiGate and how automated the whole process was. He mentioned that he was able to take the switches out of the box, connect them to the FortiGate and immediately they were manageable from the FortiGate in a matter of minutes. After spending 15 minutes raving about the usefulness of the solution, the following question was posed:
How do I change the management network for the FortiSwitches.
In the previous versions of FortiOS, the FortiLink was assigned an Automatic Private IP Address range (i.e. 169.254.x.x). The very nature of these addresses is only to facilitate communication within the same network and not intended to be routed. In the case of FortiLink, this is fine between the FortiGates and the FortiSwitches, however, it does not bode well if you want to use an external tool (like Zabbix, SolarWinds or FortiMonitor) to directly connect to the FortiSwitches to pull their performance metrics. This has since been adjusted in more recent versions of FortiOS, however the IP address assigned may still not be part of your IP addressing scheme.
Now in his case, since this is a pre-production deployment, to change the management IP addresses of the FortiSwitches by normal means would be non-impacting to production traffic if he needed to modify the IP address of the FortiLink and subsequently reboot the FortiSwitches to obtain a new IP address. However, we wanted to determine if there was a way to accomplish this in a production environment that would minimize the impact of traffic flow of the FortiSwitches.
Fortunately, I recalled an ingenious post on reddit where the redditor u/hoosee laid out the framework to accomplish exactly this. Since I have not seen this officially documented, I figured I would walk through the steps and validate the outcome of these guidelines. I am happy to say that the guidelines work as expected and Fortinet users continue to innovate in ways to solve problems.
FortiLink Deployment
Doing a deep-dive on the FortiLink protocol is beyond the scope of this article, however, I did want to highlight some of its core functionality to help illustrate the guidelines in this article.
- FortiLink over Layer 2 (datalink adjacency) allows FortiGates and FortiSwitches to mutually discover each other.
- Once the two devices discover each other, the FortiGate assigns a DHCP lease to each FortiSwitch (and configures it for NTP, DNS Servers and itself as the default gateway).
- The FortiSwitch connects via a CAPWAP tunnel to the FortiGate to establish the initial exchange of data to establish a REST API connection to the FortiSwitch for further configuration deployment.
Having a high level understanding of how the protocol works provides the foundation for the procedure used to change the IP addressing between the FortiGate and FortiSwitch while minimizing the impact on data plane traffic. The following steps below will allow this to be accomplished.
Preparation
Before any changes are made to the FortiGate, it is important to know the new IP address that will be used for the FortiSwitches. For the sake of this article, I will be using the 192.168.224.0/24 network for the new network. The following values will be assigned:
192.168.224.1 – New IP address of the FortiGate
192.168.224.2 – 192.168.224.254 – IP addresses of the FortiSwitches
Now that the IP addresses have been designated, the process to update the FortiGate with the new IP addressing can be followed.
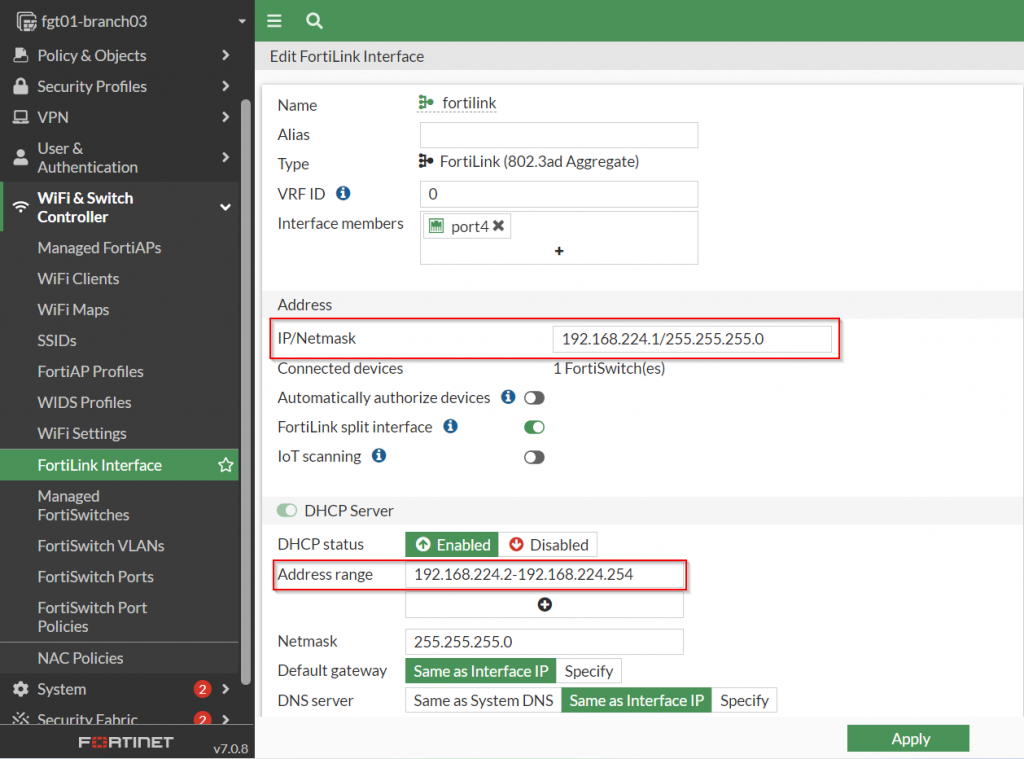
Updating the FortiLink Interface
The FortiLink Interface IP address on the FortiGate has to be modified in order to allow for the DHCP Server assigned to this interface to be active.
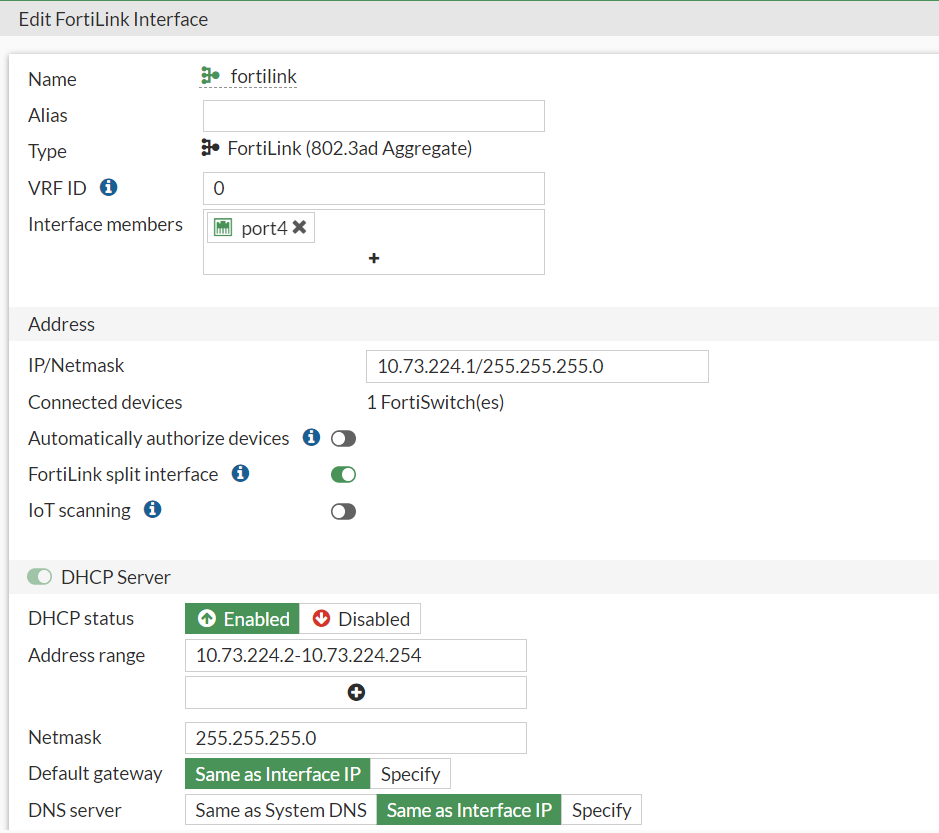
The IP address should be updated with the new IP addressing scheme. In this case, the IP address and corresponding DHCP Server entry has been updated to reflect the 192.168.224.x network as shown in the screenshot below:
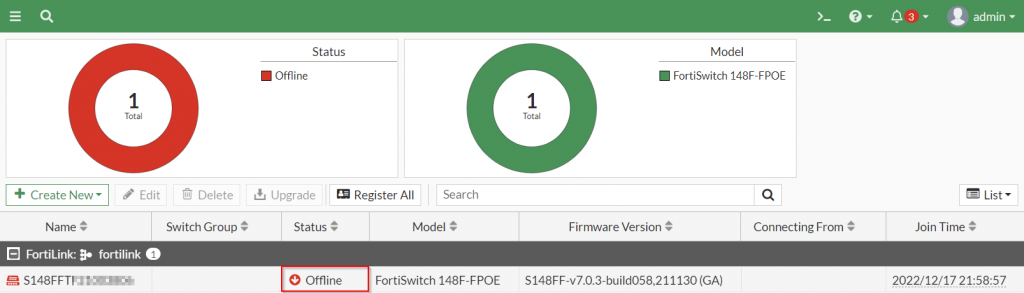
Once these new changes have been saved, the FortiSwitches will temporarily lose connectivity over the control plane to the FortiGate. This should not impact traffic flow since Layer 2 adjacency is still established and the VLANs between the FortiGate and FortiSwitch have been configured. However, subsequent attempts to modify configuration on the FortiSwitch from the FortiGate at this point will fail.
To re-enable this capability between the two, a secondary IP address with the old IP address needs to be created on the FortiGate.
Create a Secondary IP with the old address (CLI Only)
The secondary IP address functionality on the FortiGate will allow multiple IP addresses to exist on a single interface on the FortiGate. To restore control plane management between the FortiGate and the FortiSwitch, the following commands need to be executed:
config system interface
    edit fortilink
        set secondary-IP enable
        config secondary-ip
            edit 0
                set ip <new-ip> # 10.73.224.1/24
                set allowaccess ping fabric
            next
        end
    next
end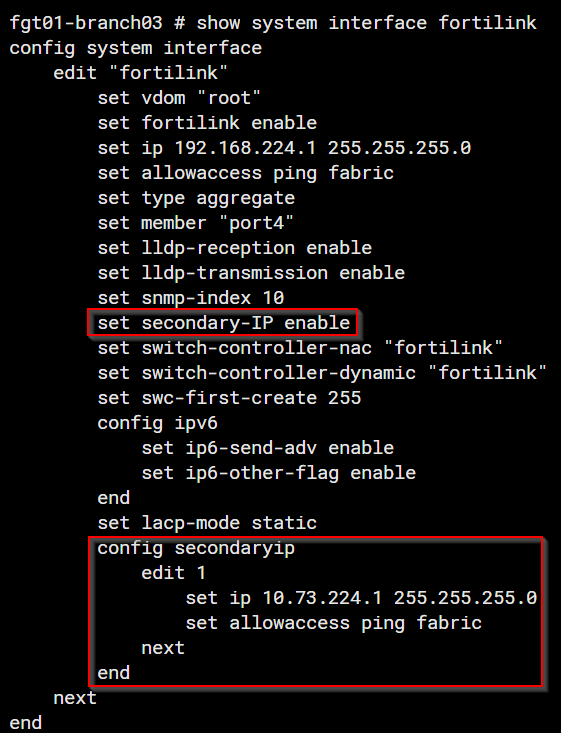
Once the FortiSwitch shows online, FortiGate oriented configuration changes can be performed.
Updating the IP address of the FortiSwitch
At this point, everything is in place for the FortiSwitch to update its IP address to the new scheme. However, the default lease time assigned to the FortiSwitches is 604800 seconds which corresponds to 7 days. In the event that you do not want to wait up to 7 days to confirm whether or not this works, you can manually force a DHCP IP address renewal directly from the FortiSwitch. To do this, you can connect to the CLI of the FortiSwitch and issue the following commands:
execute interface dhcpclient-renew internalBefore are the screenshots to show this in action:
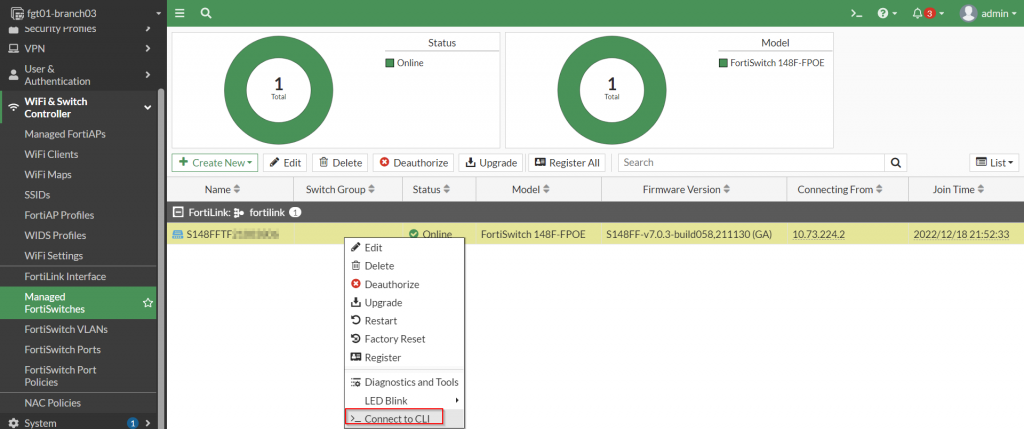
After connecting to the CLI of the FortiSwitch, the commands referenced above can be issued to force the FortiSwitch to renew its IP address from the FortiGate. This should result in the FortiSwitch being assigned an IP address from the new lease from the DHCP Server.
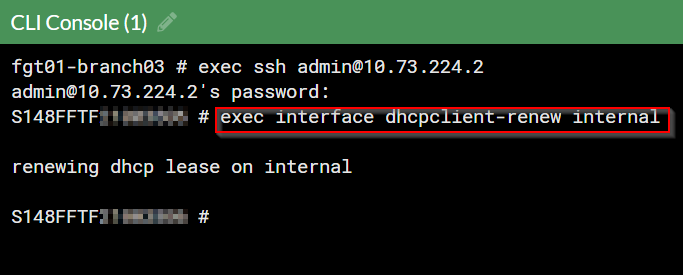
Please note: If this is successful, you will lose connectivity to the FortiSwitch via the CLI since it should no longer be accessible from the previous IP address
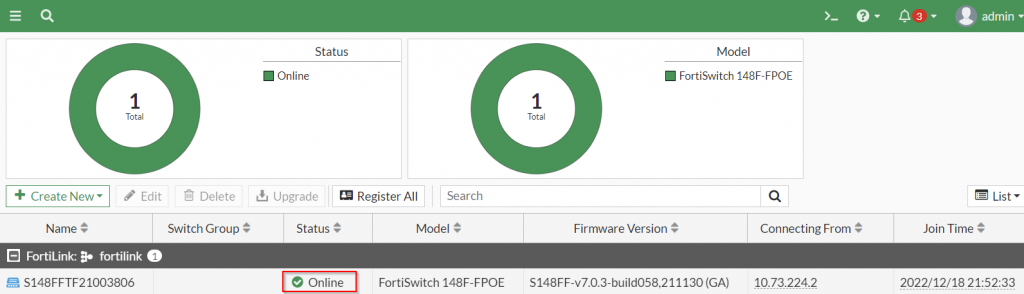
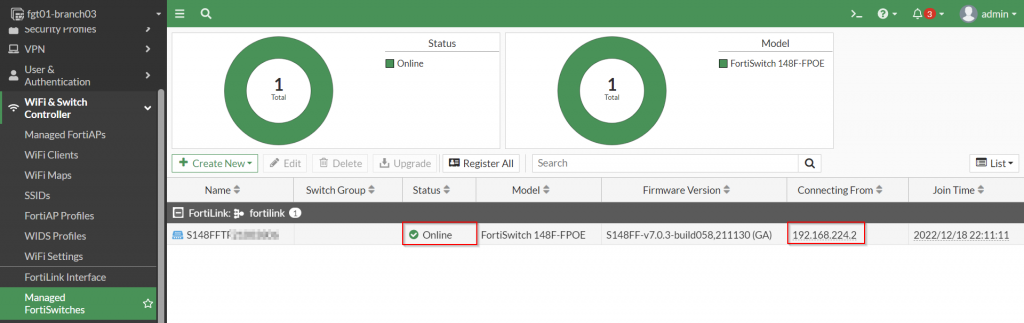
At this point, the “Managed FortiSwitches” page can be refreshed and the new IP address should be reflected on the “Connecting From” column of the FortiSwitch:
Once this has been completed for all of the FortiSwitches that were registered to the FortiGate, the secondary IP address from the FortiGate can be disabled. To accomplish this, the following command can be executed:
config system interface
    edit fortilink
        set secondary-IP disable
    next
end
And that’s it! I hope that this is useful especially if you have already deployed your FortiSwitches but do not want to go through the inconvenience of having to assign new IP addresses and potentially impacting traffic flow. Again, big shout out to my Reddit brothern u/hoosee for providing the framework to accomplish this.
As always, let me know your thoughts in the comments below! I hope this helps!
Amazing article Jonathan
it seems I can use this switch for security access with multiple IP addresses for different things? am I right?
Sorry for the delay. What other security access are you looking to use it for?
very helpful!
Very helpful article. Do have steps on how to setup snmp polling for the fortiswitch through the fortilink interface? with Zabbix?
https://docs.fortinet.com/document/fortiswitch/7.2.6/fortilink-guide/173288/configuring-snmp
This article want to use “FortiLink port that communicates with the managed FortiSwitch unit” but it doesn’t seem to allow you to create the policy for the fortilink interface