In the first part of this series, an overview of Bring Your Own Device (BYOD) with the FortiAuthenticator was covered. In addition to that, guidance was provided to set up a simple portal on the FortiAuthenticator to allow for simple registration of an account and provide authentication to join the guest wireless network.
This article is a continuation of the series for configuring BYOD on the FortiAuthenticator to work in conjunction with the FortiGate and FortiAP.
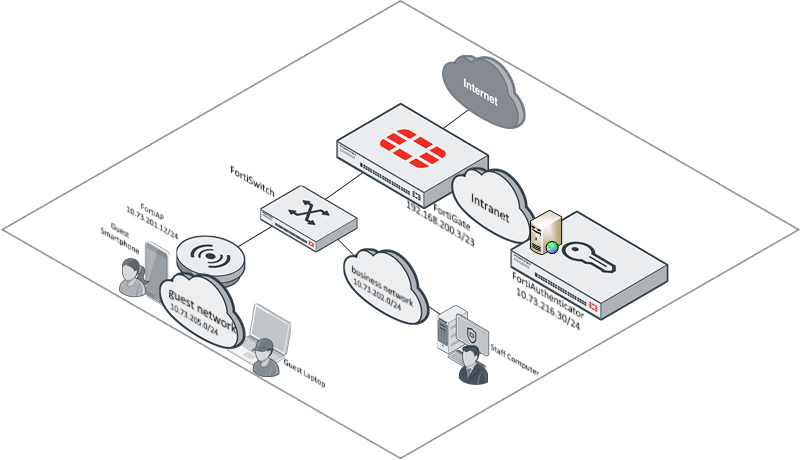
Topology Example
As a reminder, here is the topology used for the basis of this article.
Given that the FortiAuthenticator has been configured, the focus can now occur on the wireless controller for access.
Configuring the Wireless Controller for BYOD Guest Network
The BYOD guest portal can be configured with non-Fortinet devices, however it is beyond the scope of this article to go through the configuration required on those devices. It is the hope that seeing the Fortinet equivalent (FortiGate and FortiAP) configuration, will allow the reader to extrapolate the required configuration on the non-Fortinet equipment.
This section will focus on the necessary configuration to get this feature to work with the FortiAuthenticator. It is assumed that the basic connectivity between the FortiAP and FortiGate has been established and that the FortiAPs are under management on the FortiGate.
Configure FortiAuthenticator as a RADIUS Server
The first in preparing the FortiGate wireless controller functionality to provide the BYOD guest portal to users on a guest network is to configure the FortiAuthenticator as a RADIUS server. To do this, complete the following steps:
1. Log into the FortiGate as an administrative user
2. Click on “User & Authentication” | “RADIUS Servers” ; Click “Create New”
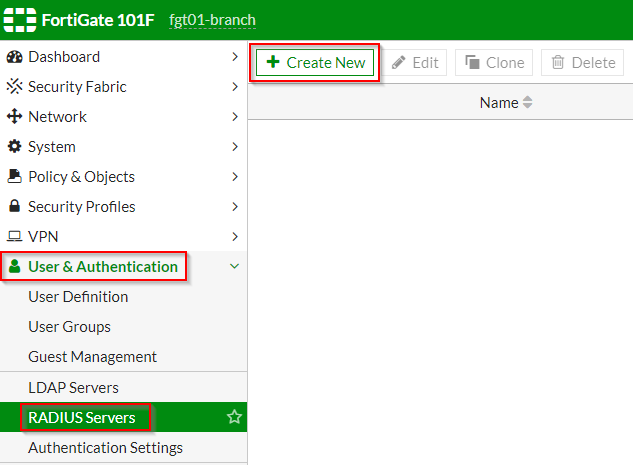
3. Under the “New RADIUS Server” page | Fill out the applicable information as shown in the screenshot below:
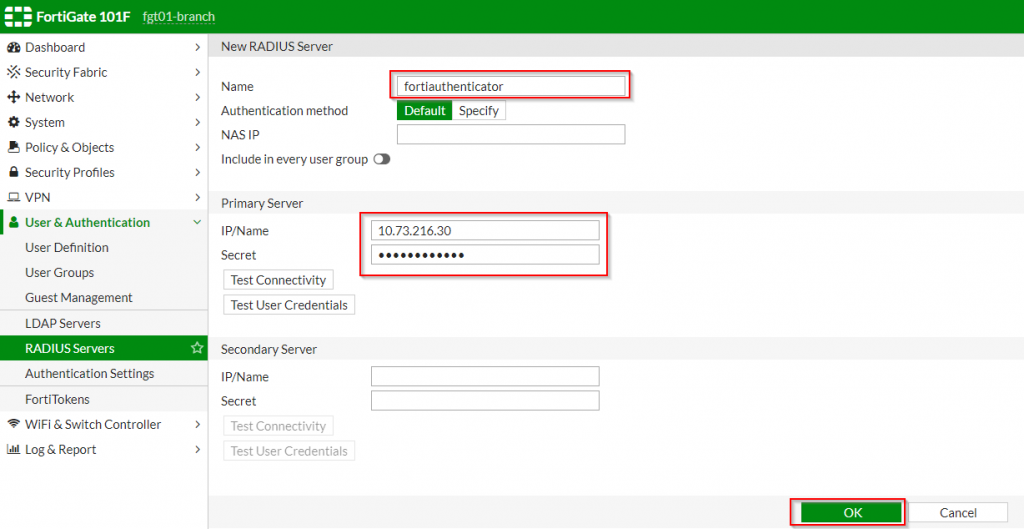
| Option Name | Value |
| Name | FortiAuthenticator |
| IP/Name | <IP address of FortiAuthenticator> (i.e. 10.73.216.30) |
| Secret | <password set on FortiAuthenticator RADIUS Client> |
4. Click “OK”
Once the FortiAuthenticator has been defined as a RADIUS server, the next step is to define a group that will authenticate against it as an identity source.
Configure the Remote Authentication User Group
The remote authentication user group instructs the FortiGate to leverage the FortiAuthenticator for authorizing users to access network resources. To configure this group on the FortiGate, complete the following steps:
1. Click on “User & Authentication” | “User Groups” ; Click “Create New”
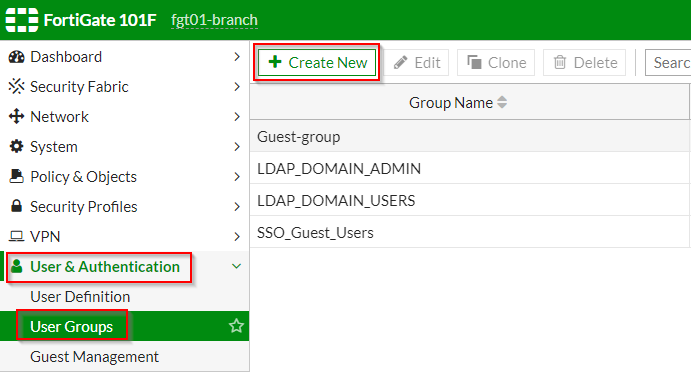
2. Under the “New User Group” section | Fill out the applicable fields as shown in the screenshots below:
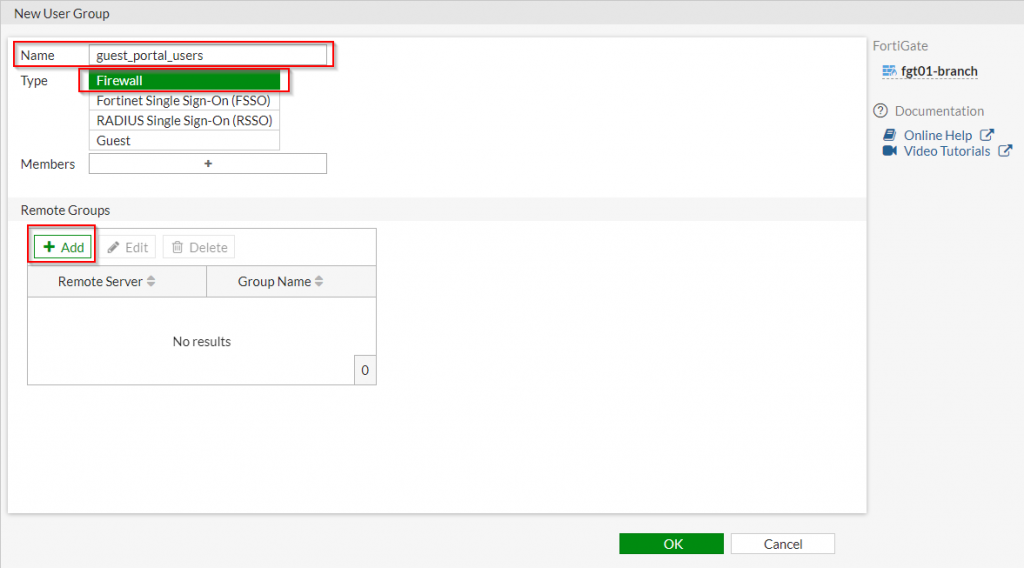
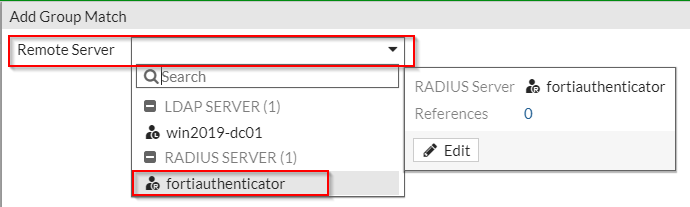
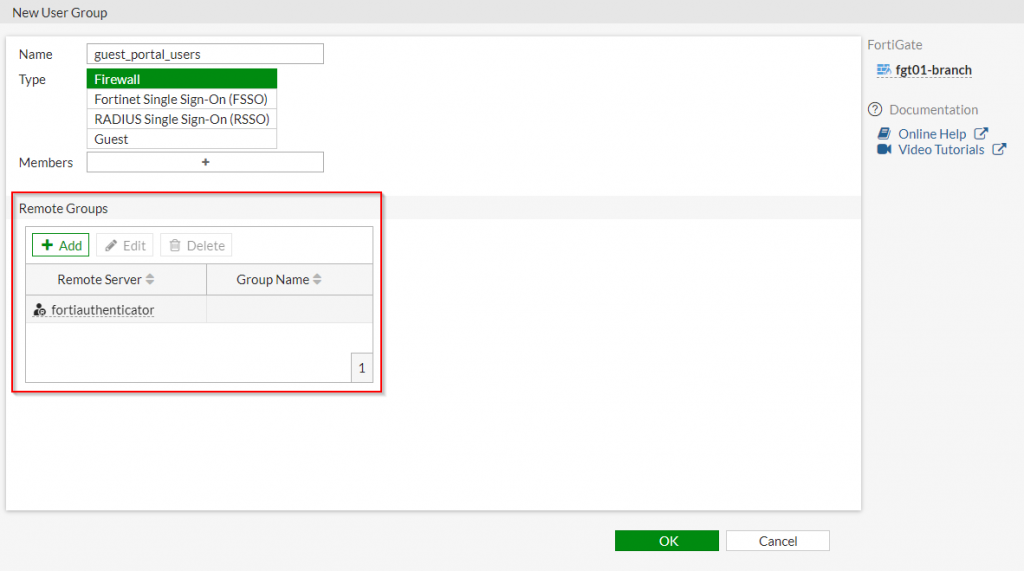
3. Click “OK”
Once the remote authentication user group has been created, the administrator can proceed to creating the corresponding wireless interface which will reference this group.
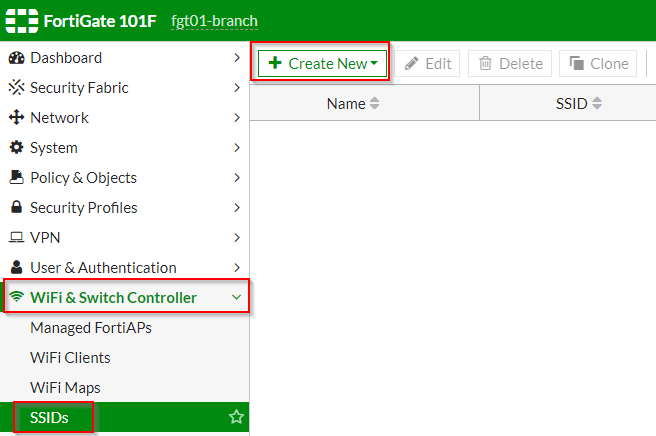
Configuring the Wireless SSID referencing the external Guest Portal
Within the FortiGate, the settings to configure access to an external Guest portal is handled within the interface definition. To set up a wireless SSID to reference this portal, please complete the following steps:
1. Click on “WiFi & Switch Controller” | “SSIDs” ; Click “Create New”
2. Under the “Create New SSID” page | Fill out the applicable options as shown in the screenshot below:
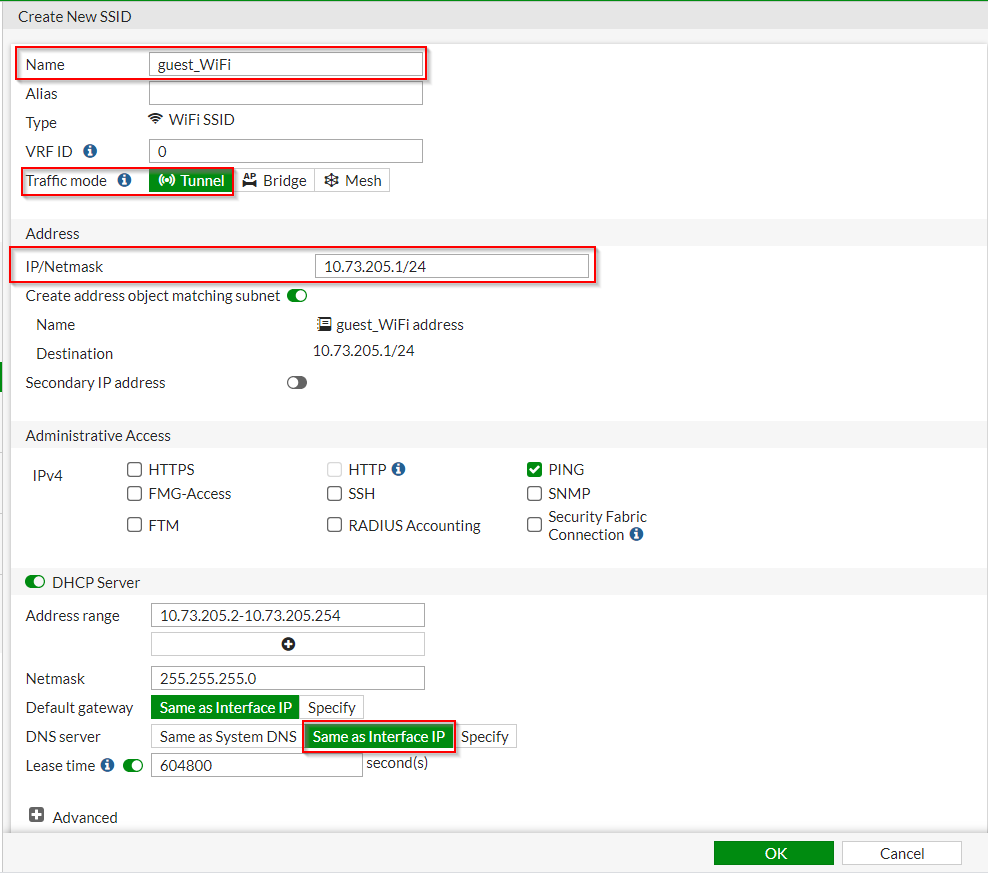
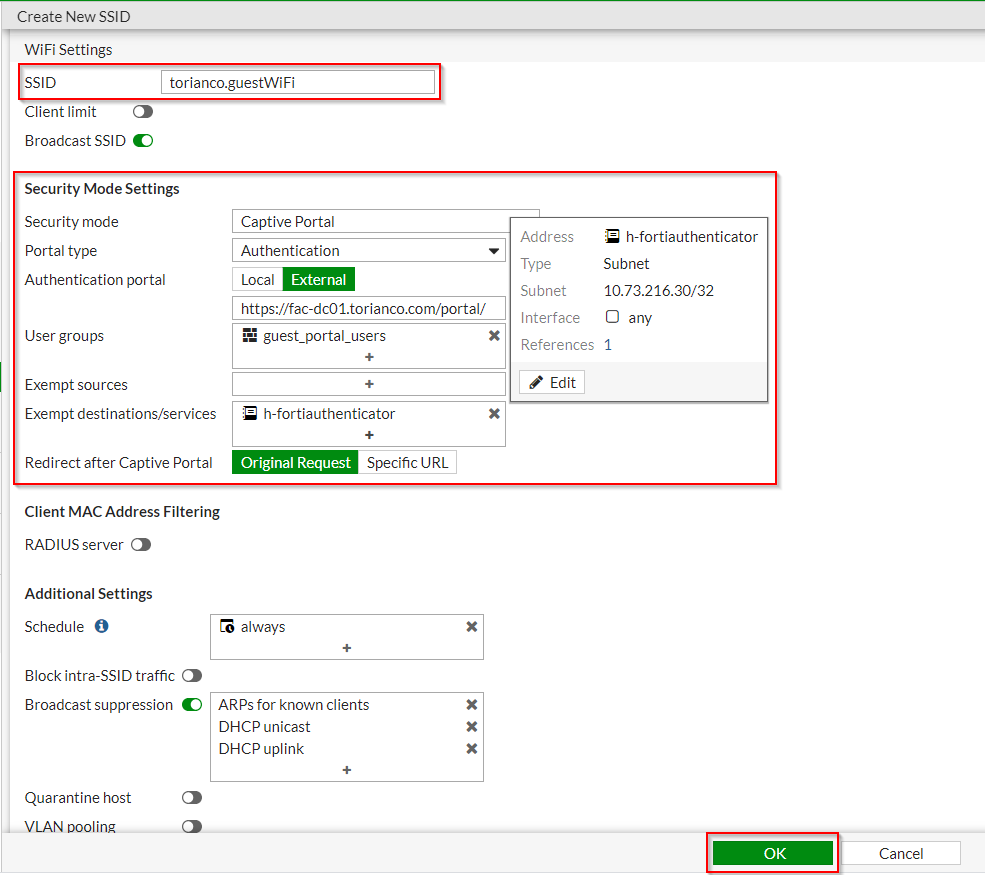
| WiFi Option Name | Value |
| SSID | <SSID for Guest Portal> (i.e. torianco.guestWiFi |
| Broadcast SSID | <enabled> |
| Security Mode | Captive Portal |
| Portal Type | Authentication |
| Authentication Portal | External ; <URL to captive portal> (i.e. https://fac-dc01.torianco.com/portal/) |
| User Groups | <Remote Authentication Group> (i.e. guest_portal_users) |
| Exempt destinations/services | <object for FortiAuthenticator> (i.e. h-fortiauthenticator) |
| Redirect after Captive Portal | Original Request |
3. Click “OK”
Once the SSID has been created, firewall rules on the FortiGate must be created to allow the necessary traffic flow once the guest user has been authorized via the Guest Portal.
Creating Firewall Rules for Guest BYOD Access
Since the FortiGate is a firewall, it does not implicitly allow the necessary access between the guest clients and the FortiAuthenticator. It is assumed that the reader of this article knows how to create a firewall rule so a screenshot of the necessary rules will be provided:
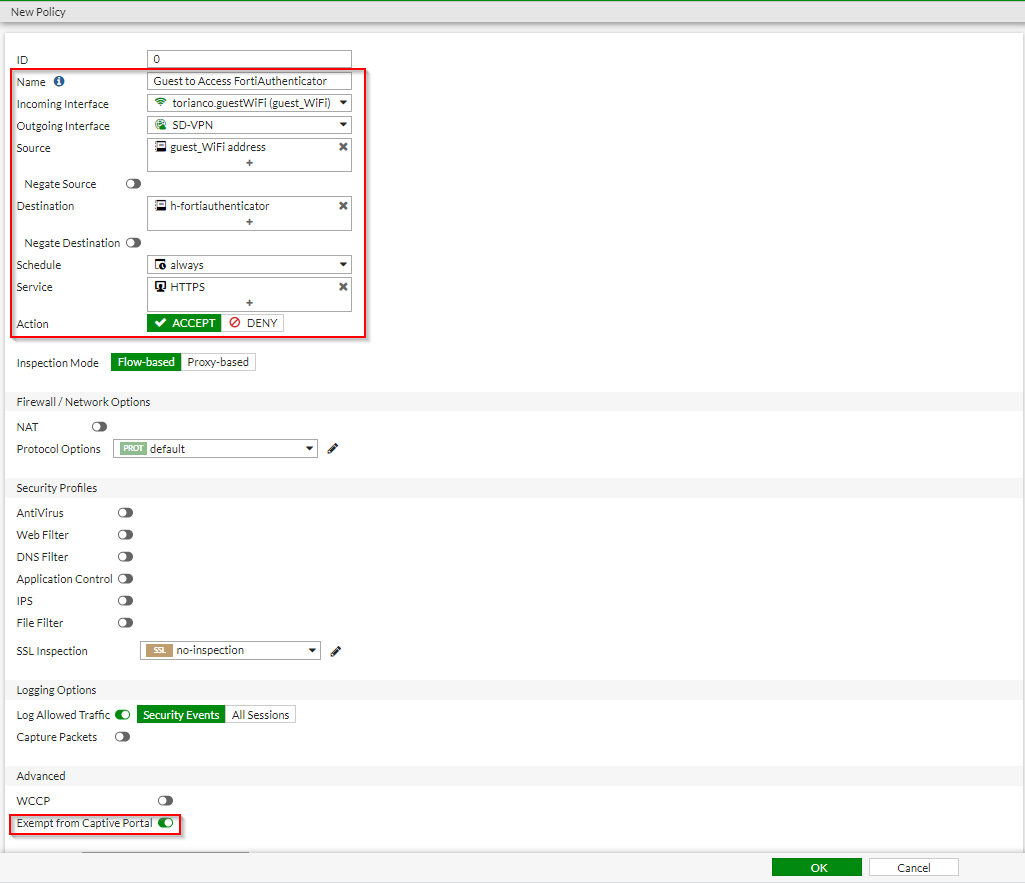


Once these firewall rules have been created, a user should now be able to connect to the Guest SSID, go through the self-registration process on the FortiAuthenticator and access the Internet via the Guest network.
Getting Internet Access via the Guest Portal
Once the FortiAuthenticator has been configured with the guest portal and the wireless controller is configured to connect to the FortiAuthenticator, a user can go through the steps of getting access to the guest network. To begin this process, the user needs to connect to the guest wireless network to register for an account. Once the account has been registered, the user needs to login with those newly minted credentials and if all works as expected, gain access to the guest network.
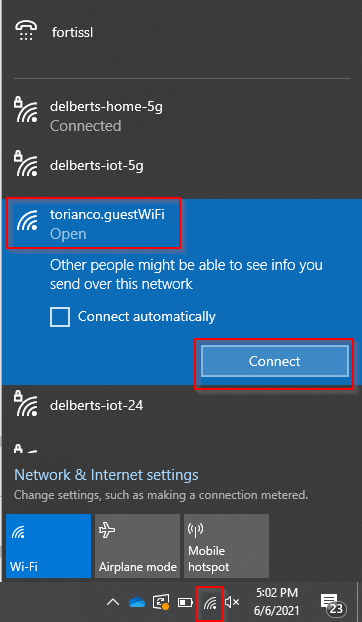
Connect to the Wireless Network
This configuration is determined by the wireless controller but in this example, the SSID that is advertised is “torianco.guestWiFi”. Below is an example of the steps one can take using a Windows 10 Laptop to connect to this guest network and get access to the guest portal page:
1. Click the “Wireless Icon” in the system tray | Select the SSID (torianco.guestWiFi) | Click Connect
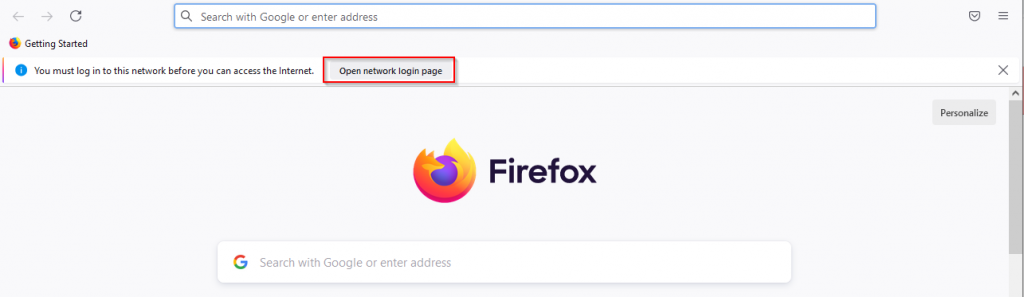
2. Open a browser (i.e. Firefox) | Click the “Open network login page” button near the “You must log in to this network before you can access the Internet” message
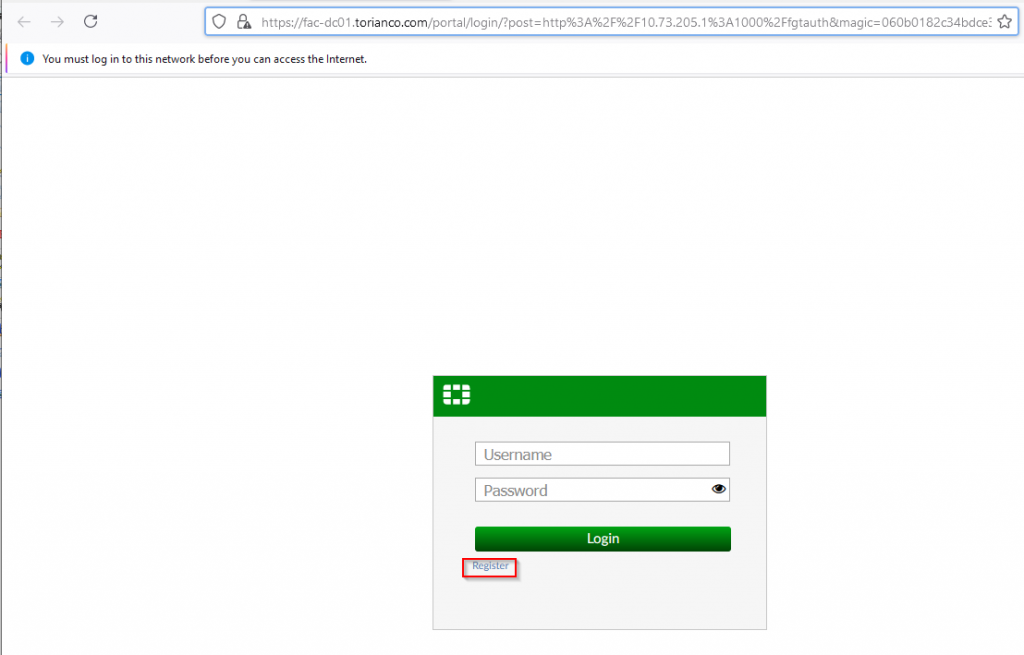
3. After being redirected to the FortiAuthenticator portal logon page | Click “Register”
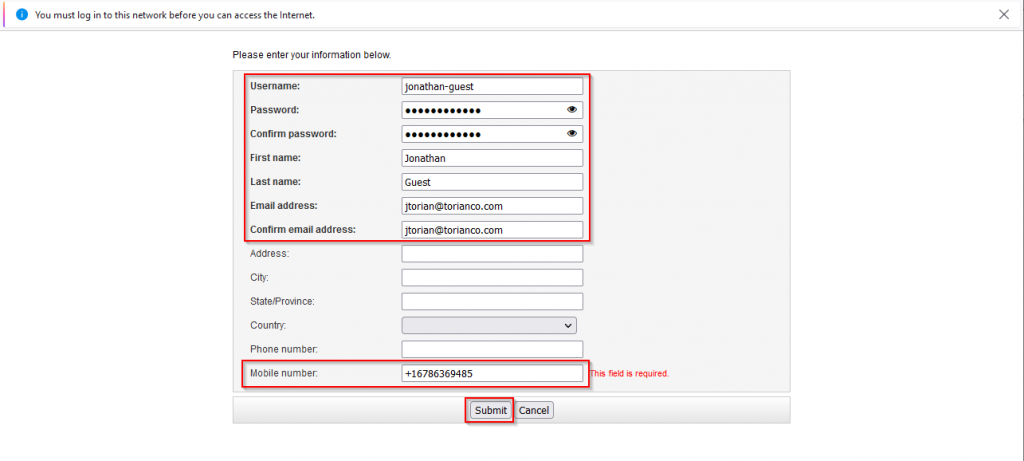
4. On the registration page, fill out the applicable information as shown in the screenshot below | Click “Submit”:
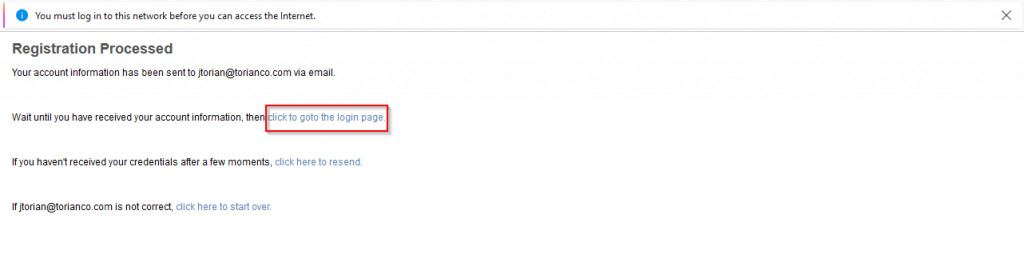
5. Upon successful registration, confirm the following page | Click “click to goto the login page”
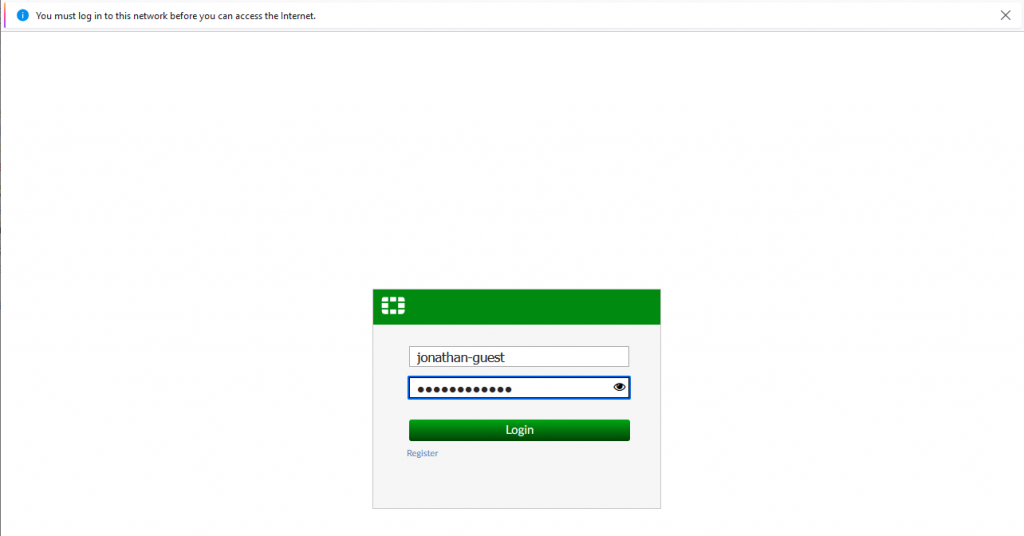
6. On the FortiAuthenticator Guest portal logon page | Enter the logon credentials from the registration:
Upon successful logon, you should be able to access the Internet via the Guest Network.
Validation on FortiAuthenticator
To see the Guest portal registration and authentication, check out the FortiAuthenticator logs in the screenshot below:

It is important to note the “Source IP” column which shows the IP addresses that the requests come in from. However you can see each step of the process and ultimately when access is granted to the user to access the Internet via the guest network.
I hope this has been a helpful explanation of how to configure the FortiGate to allow a wireless users to access a guest network with the FortiAuthenticator serving the guest portal.
In the last (and final) installment, I will explain how to configure the FortiAuthenticator and FortiGate to work in conjunction where users who have previously authenticated will not have to do subsequent authentications after their initial registration and successful log on.
As always, if you have any questions or feedback about the information included in this post, leave a comment below.