
With the release of FortiClientEMS 8.0, I wanted to get familiar with the on-premises version and all of its new capabilities. So I stood up the EMS VM appliance in my lab and started working through the features. It did not take long to find one that needed more than EMS alone: the new Endpoints | All Events page. It gives the administrator one place to view vulnerability, antivirus/malware, PUA, web filter and telemetry events from every managed endpoint, and to take action on them from the same screen. If you are using FortiClient Cloud, this is available by default. If you are running FortiClientEMS on-premises, it requires an integration with an Elasticsearch time-series database.
Since I wanted to take advantage of everything FortiClientEMS 8.0 has to offer, I needed an Elasticsearch server. Fortinet documents how to point FortiClientEMS at an existing Elasticsearch cluster, and on paper it is a single command. In practice, I deployed EMS using the KVM VM appliance image and ran into a red “Internal Error” on the All Events page that took some digging to resolve. The fix involved a handful of appliance CLI commands that I could not find tied together in the documentation. So, as with a few of my other posts, I decided to write the guide I wish I had found.
This one is a little different from my usual posts in two ways. First, I do not have GUI screenshots for most of this process, but nearly all of it happened at the command line, so I have included the actual command output as the figures instead. Second, I built this lab with the help of an AI assistant acting as my Proxmox system administrator. I will touch on that at the end, but the focus of this article is the Fortinet side of things.
Components
Here are the components that make up this solution and the role each one plays:
- FortiClientEMS 8.0 – The endpoint management server. It stores events it receives from FortiClient in Elasticsearch and queries them to populate the All Events page. In my lab, this is the KVM VM appliance image (
fctems01). - FortiClient 8.0 – The endpoint agent that reports vulnerability, AV, web filter and other events to FortiClientEMS.
- Elasticsearch – The time-series database that stores the event data. In my lab, this is a single-node Elasticsearch 8.19 instance (
fctes01). - FortiGate – Not directly part of the integration, but it controls outbound internet access for the lab VLAN. That comes up later.
- Proxmox VE – The hypervisor hosting everything in this lab.
It is important to understand the role each component plays so you know where to look when something does not work. That turned out to be the key to solving this problem.
Assumptions
The following assumptions are being made about the existing environment:
- FortiClientEMS 8.0 is deployed from the VM appliance image (KVM/qcow2 in my case) and is licensed and reachable
- At least one FortiClient 8.0 endpoint is registered to FortiClientEMS
- You have a Linux host or container where Elasticsearch can be installed, on a network FortiClientEMS can reach over TCP/9200
- The Elasticsearch host has outbound internet access to download packages (or you can bring the package in yourself)
What FortiClientEMS Needs from Elasticsearch
Before building anything, it is worth reviewing what the FortiClientEMS 8.0 Administration Guide says about the integration:
- Version – FortiClientEMS can connect to existing Elasticsearch clusters running 8.14.0 or later.
- Authentication – FortiClientEMS can use a username/password or an API key. The API key is considered best practice, and if you provide both, EMS prefers the API key.
- TLS – If the Elasticsearch cluster uses a certificate that is not publicly trusted, you must provide the CA certificate to EMS using
--es.cert. The file must be stored outside of/opt/forticlientems, because that directory is replaced during EMS upgrades. - Permissions – The account EMS uses needs the following index privileges on the
forticlientemsindexes:create_index,delete_index,index,view_index_metadata,write,create,all,manage. It also needs themanage_index_templatesandmanage_ilmcluster privileges. - Index lifecycle – EMS creates and manages its own lifecycle policies. Data is “hot” for up to 45 days, “warm” from 45 to 120 days, and deleted after 120 days. The All Events page queries up to 30 days of data.
Please Note: The ES sizing guidance in the Administration Guide recommends three data nodes with 4 vCPUs and 16 GB of RAM each for a “small” deployment of up to 40,000 endpoints. That is the right starting point for production. For a lab with a handful of endpoints, a single small node is plenty. That is what I built here, and I will call out the differences along the way.
Preparing Elasticsearch
Sizing the Elasticsearch Node for a Lab
RAM was my scarcest resource, so the goal was to keep Elasticsearch as light as possible without turning off security. I considered three options: installing Elasticsearch inside the FortiClientEMS VM, building a separate VM, or using a Linux container (LXC). I went with a container for two reasons. It has no separate operating system to run, so it uses the least memory. And it does not modify the EMS appliance at all.
Here is the configuration of the container:
Container:   fctes01 (unprivileged LXC, Ubuntu)
CPU:         2 vCPU
Memory:      2 GiB (+512 MiB swap)
Disk:        32 GB
Network:     Same VLAN as FortiClientEMS, static IP
Figure 1. – Lab configuration of the Elasticsearch container
Installing Elasticsearch
Elasticsearch was installed from Elastic’s official, signed apt repository. Using the 8.x repository keeps the node on a version that FortiClientEMS supports (8.14.0 or later):
curl -fsSL https://artifacts.elastic.co/GPG-KEY-elasticsearch | gpg --dearmor -o /usr/share/keyrings/elasticsearch-keyring.gpg
echo "deb [signed-by=/usr/share/keyrings/elasticsearch-keyring.gpg] https://artifacts.elastic.co/packages/8.x/apt stable main" > /etc/apt/sources.list.d/elastic-8.x.list
apt-get update && apt-get install elasticsearch
Figure 2. – Commands to install Elasticsearch 8.x from Elastic’s repository
Pro-Tip: My first install attempt failed because the new container’s IP had no outbound internet access. In my lab, the FortiGate only allows specific addresses out to the internet from that VLAN. If you use static IPs for new lab hosts, remember to update your FortiGate address objects and policies before you start downloading packages. It saves some head scratching.
On a package install, Elasticsearch 8.x automatically turns on security. It creates its own certificate authority, issues a TLS certificate for the HTTP interface on port 9200, and turns on authentication. Keep this in mind, because that auto-generated CA is at the heart of the problem later in this article.
Tuning Elasticsearch for a Single-Node Lab
The following changes were made to /etc/elasticsearch/elasticsearch.yml to run as a single node and reduce memory usage:
cluster.name: fctems-lab
node.name: fctes01
discovery.type: single-node
xpack.ml.enabled: false
ingest.geoip.downloader.enabled: false
Figure 3. – Additions to elasticsearch.yml for a lightweight single-node lab
Below is a summary of the settings above:
discovery.type: single-nodetells Elasticsearch not to look for other cluster members. (The auto-generatedcluster.initial_master_nodesline must be removed when you use this setting.)xpack.ml.enabled: falseturns off machine learning, which FortiClientEMS does not need and which uses memory.ingest.geoip.downloader.enabled: falsestops Elasticsearch from downloading GeoIP databases in the background.
Next, the Java heap was pinned to 768 MB by creating /etc/elasticsearch/jvm.options.d/heap.options:
-Xms768m
-Xmx768m
Figure 4. – Java heap settings for the Elasticsearch node
After starting the service, the node reported healthy:
{"name":"fctes01","cluster_name":"fctems-lab","version":"8.19.22"}
{"status":"green","number_of_nodes":1,"active_shards":3}
heap max 768MiB, heap used 449MiB
Figure 5. – Output validating the Elasticsearch node version, cluster health and heap
The entire container settled at about 1.3 GiB of RAM in use.
Please Note: The HTTP certificate Elasticsearch generates on install includes the host’s IP addresses at the time of install. Make sure the node has its final IP address before you install Elasticsearch, or you will have to reissue the certificate.
Creating the FortiClientEMS Role, User and API Key
Following the principle of least privilege, I created a dedicated role and user for FortiClientEMS instead of handing it the elastic superuser. The following commands were run against the Elasticsearch API as the elastic user:
# Role with the privileges FortiClientEMS requires
curl --cacert http_ca.crt -u elastic -X PUT "https://<ES_IP>:9200/_security/role/fctems_role" \
  -H 'Content-Type: application/json' -d '{
  "cluster": ["manage_index_templates","manage_ilm","monitor"],
  "indices": [{
    "names": ["forticlientems*"],
    "privileges": ["create_index","delete_index","index","view_index_metadata","write","create","all","manage"]
  }]
}'

# User assigned to that role
curl --cacert http_ca.crt -u elastic -X POST "https://<ES_IP>:9200/_security/user/fctems" \
  -H 'Content-Type: application/json' -d '{"password":"<password>","roles":["fctems_role"]}'

# API key issued on behalf of the fctems user
curl --cacert http_ca.crt -u elastic -X POST "https://<ES_IP>:9200/_security/api_key/grant" \
  -H 'Content-Type: application/json' -d '{
  "grant_type":"password","username":"fctems","password":"<password>",
  "api_key":{"name":"fctems01-ems"}
}'
Figure 6. – Commands to create the FortiClientEMS role, user and API key
Below is a summary of the commands above:
- The role grants exactly the privileges listed in the Administration Guide on
forticlientems*indexes. I also added the read-onlymonitorcluster privilege so EMS can check cluster health. - The user
fctemsis assigned only that role. - The API key is created with the grant API. The
elasticsuperuser issues the key on thefctemsuser’s behalf, so the key can never have more access thanfctems_role. The response contains anencodedvalue. That encoded value is what you give FortiClientEMS.
Pro-Tip: If you create the API key while logged in as fctems itself, the request fails, because the role above doesn’t include manage_own_api_key. Using the grant API avoids adding that privilege.
Before handing the key to EMS, I tested that it could do what EMS needs and nothing else:
key -> authenticate:                         {"user":"fctems","auth":"api_key","key":"fctems01-ems"}
key -> list users (expect 403):              403
key -> create index forticlientems-test:     200
key -> delete index forticlientems-test:     200
key -> create index outside scope (403):     403
Figure 7. – Validation of the API key permissions
Connecting FortiClientEMS to Elasticsearch
With Elasticsearch ready, the next step is to enable the events feature on FortiClientEMS. On the VM appliance, this is done from the ems user’s CLI:
ems@fctems01 $> config set events --enable.feature=true --es.hosts="<ES_IP>:9200" --es.key=<ENCODED_API_KEY>
Events settings were updated successfully.
Figure 8. – Enabling the events feature on FortiClientEMS
Important Notes: The 8.0 Administration Guide shows this flag as --enabled.feature=true. On my EMS 8.0 VM appliance, the CLI help lists it as --enable.feature. When the documentation and the CLI disagree, trust config set events --help on your own build.
The command succeeded. However, when I browsed to Endpoints | All Events, I was greeted by a red “Internal Error” banner, and no events were populated.
Troubleshooting the “Internal Error”
The FortiClientEMS GUI does not give much to go on with a generic “Internal Error.” As in my ZTNA troubleshooting post, the fastest way forward is to look at each component in the path and check what it sees.
Elasticsearch
The first thing to confirm is whether FortiClientEMS is reaching Elasticsearch at all. I checked for any forticlientems indexes (EMS creates these when it first connects successfully), and then looked at the Elasticsearch log at /var/log/elasticsearch/<cluster-name>.log:
[WARN ][o.e.h.AbstractHttpServerTransport] [fctes01] caught exception while handling client http traffic,
closing connection Netty4HttpChannel{localAddress=/<ES_IP>:9200, remoteAddress=/<EMS_IP>:44770}
io.netty.handler.codec.DecoderException: javax.net.ssl.SSLHandshakeException: (bad_certificate) Received fatal alert: bad_certificate
Caused by: javax.net.ssl.SSLHandshakeException: (bad_certificate) Received fatal alert: bad_certificate
Figure 9. – Elasticsearch log showing the TLS handshake failure from FortiClientEMS
This one entry answered most of the question:
- The network path is fine. FortiClientEMS reached Elasticsearch on TCP/9200.
- The API key never came into play. The connection failed during the TLS handshake, before any authentication.
- FortiClientEMS rejected Elasticsearch’s certificate (it sent the
bad_certificatealert).
Remember the certificate authority that Elasticsearch generated automatically at install? FortiClientEMS has no reason to trust it. That is exactly the situation --es.cert exists for.
FortiClientEMS VM Appliance
This is where the VM appliance changes things. On a standard Linux EMS install, you copy the CA file to the server with SCP and point --es.cert at it. The VM appliance, however, is hardened:
- The
forticlientemsuser that runs EMS has no login - Only the
emsuser has SSH access, and it gets a restricted CLI, not a Linux shell - There is no obvious way to upload a file from outside
So the question became: how do you get a CA certificate onto an appliance you cannot SCP into?
Before looking for workarounds, I checked what the appliance CLI offers. First, the events configuration options:
ems@fctems01 $> config set events --help

Flags:
      --enable.es.queue string      Enables the elasticsearch queue. Accepted values: true|false
      --enable.event.queue string   Enables the event queue. Accepted values: true|false
      --enable.feature              Enables the endpoint events feature. Accepted values: true|false (default true)
      --es.cert string              The path to the elasticsearch CA cert
      --es.hosts string             The elasticsearch host
      --es.key string               The elasticsearch API key
      --es.password string          The elasticsearch account password
      --es.user string              The elasticsearch user
  -h, --help                        help for events
      --use.db.prefix               Enable the use of the DB prefix as a prefix for the ES indices (default true)
Figure 10. – Output of “config set events –help” on the FortiClientEMS VM appliance
Two things stand out. There is no option to skip certificate verification, which is good security design and confirms that the trust problem has to be fixed properly. And --es.cert expects a path to a file on the appliance.
Next, I checked the list of operational commands with execute help. The output is long, so here are the entries that matter for this problem:
ems@fctems01 $> execute help

Available Commands:
  copyfile         copies a file to/from a location(s) on the host
  ftp              copies files to/from a remote host using the FTP service
  import-cert      Imports a previously uploaded cert to the linux CA cert store.
  list-certs       Lists the custom certificates previously imported to this EMS Virtual Appliance
  ls               functions identically to Linux 'ls -ltrh'
  remove-cert      Removes a previously imported cert from the linux CA cert store.
  scp              copies files to/from a remote host using the SCP service
  sftp             copies files to/from a remote host using the SFTP service
  ...
Figure 11. – Relevant entries from “execute help” on the FortiClientEMS VM appliance
This is the key finding. The appliance can pull a file in with execute scp, sftp or ftp, and it can add a certificate to its Linux CA store with execute import-cert. The last detail was where the file has to go, which execute scp --help spells out:
- If writing to a remote host, the --local.file must be located in one of `/exchange`, `/opt/forticlientems`,
  or `/var/log/forticlientems` (or subfolders of these folders)
- If reading from a remote host, --local.file must be located in either `/exchange` or `/opt/forticlientems`
  (or subfolders of these folders)
Figure 12. – File location constraints from “execute scp –help”
The documentation says the CA file must live outside /opt/forticlientems, because that directory is replaced during upgrades. That leaves /exchange as the right place for the certificate.
Options Considered
Before settling on a fix, I weighed the available options:
- Use the appliance’s own tools (
execute scp,execute import-certand--es.cert). This is supported, keeps TLS on end to end, and changes nothing on the appliance outside its own CLI. - Give Elasticsearch a publicly trusted certificate (for example, from Let’s Encrypt using a DNS challenge). This is clean, but it adds a DNS record, a certificate issuance process and renewal to maintain.
- Turn off TLS on the Elasticsearch HTTP interface. This is fast, but it sends the API key in cleartext, and I could not confirm that FortiClientEMS even supports plain HTTP here.
- Mount the EMS VM disk from the hypervisor and copy the file in. This works, but it is outside supported methods and requires EMS downtime. It is a last resort.
Option 1 was the clear winner.
The Fix: Getting the Elasticsearch CA onto the FortiClientEMS Appliance
Step 1 – Stage the CA Certificate
On a package install, the Elasticsearch HTTP CA certificate is located at /etc/elasticsearch/certs/http_ca.crt. This is a public certificate, so it is not sensitive. I copied it into the home directory of a temporary user on the Elasticsearch host, so the appliance could pull it over SCP:
useradd -m -s /bin/bash -c 'TEMP EMS cert transfer' emsxfer
passwd emsxfer
install -o emsxfer -g emsxfer -m 644 /etc/elasticsearch/certs/http_ca.crt /home/emsxfer/es_ca.crt
Figure 13. – Staging the CA certificate for transfer on the Elasticsearch host
Please Note: This account exists only for the file transfer. I also turned off TCP forwarding and TTY allocation for it in the SSH configuration, and deleted the account and that configuration as soon as the transfer finished. Any host FortiClientEMS can reach over SCP works just as well.
Step 2 – Pull the CA Certificate onto the Appliance
From the FortiClientEMS CLI, the --read flag tells execute scp to copy from the remote host to the appliance:
ems@fctems01 $> execute scp --read --remote.ip <ES_IP> --remote.user emsxfer --remote.password <password> --remote.file /home/emsxfer/es_ca.crt --local.file /exchange/es_ca.crt
Connectivity test using service 'scp' to remote host <ES_IP> with user emsxfer for reading file /home/emsxfer/es_ca.crt passed !
File /home/emsxfer/es_ca.crt:<ES_IP> successfully copied to /exchange/es_ca.crt

ems@fctems01 $> execute ls /exchange
total 4.0K
-rw-r--r-- 1 root root 1.9K Sep 27 21:39 es_ca.crt
Figure 14. – Pulling the Elasticsearch CA certificate into /exchange on the appliance
Step 3 – Import the CA into the Appliance’s Trusted Certificate Store
Next, execute import-cert adds the file to the appliance’s Linux CA store. Note that it takes just the file name of the uploaded certificate, not a full path:
ems@fctems01 $> execute import-cert es_ca.crt
Updating certificates in /etc/ssl/certs...
rehash: warning: skipping ca-certificates.crt,it does not contain exactly one certificate or CRL
rehash: warning: skipping fds_ca.pem,it does not contain exactly one certificate or CRL
1 added, 0 removed; done.
Running hooks in /etc/ca-certificates/update.d...
done.

ems@fctems01 $> execute list-certs
1       - es_ca.crt
2       - fds_ca.crt
Figure 15. – Importing the CA certificate and validating it with “execute list-certs”
Please Note: The “rehash: warning” lines are expected and harmless. Those files are bundles containing multiple certificates, which the rehash utility always skips. The line that matters is “1 added, 0 removed; done.”
Step 4 – Point FortiClientEMS at the CA Certificate
Finally, the CA path was added to the events configuration. This is the method documented in the Administration Guide:
ems@fctems01 $> config set events --es.cert=/exchange/es_ca.crt
Events settings were updated successfully.
Figure 16. – Configuring the Elasticsearch CA certificate path on FortiClientEMS
If you are setting this up from scratch, you can do it all in one command:
config set events --enable.feature=true --es.hosts="<ES_IP>:9200" --es.key=<ENCODED_API_KEY> --es.cert=/exchange/es_ca.crtFigure 17. – Complete events configuration command for the FortiClientEMS VM appliance
Validating the Results
Elasticsearch
Within moments of updating the configuration, the bad_certificate errors stopped appearing in the Elasticsearch log, and FortiClientEMS established connections to port 9200. Better yet, EMS created its indexes on its own:
index                                health pri rep docs.count
forticlientems_alerts_8000121-000001 yellow   1   1          0
forticlientems_osevt_8000121-000001  yellow   1   1          0
forticlientems_pua_8000121-000001    yellow   1   1          0
forticlientems_scores_8000121-000001 yellow   1   1          0
forticlientems_sysevs_8000121-000001 yellow   1   1          0
forticlientems_tags_8000121-000001   yellow   1   1          0
forticlientems_vpn_8000121-000001    yellow   1   1          0
forticlientems_vulns_8000121-000001  yellow   1   1          0
Figure 18. – Indexes created by FortiClientEMS in Elasticsearch
EMS also created a matching index template (for example, forticlientems_vulns_8000121_template) and a lifecycle policy (for example, forticlientems_vulns-policy) for each index. The 8000121 in each name is the EMS version and build (8.0.0 build 0121). That is controlled by the use.db.prefix option shown in Figure 10.
FortiClientEMS
Back in the FortiClientEMS GUI, the “Internal Error” was gone. After the endpoints reported in, Endpoints | All Events filled with events.
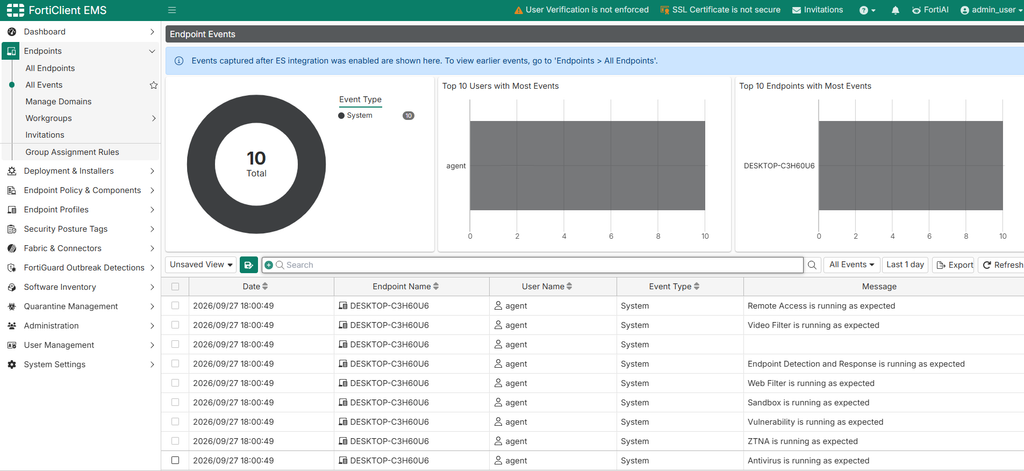
Figure 19. – Screenshot of the “Endpoints | All Events” page populated with events
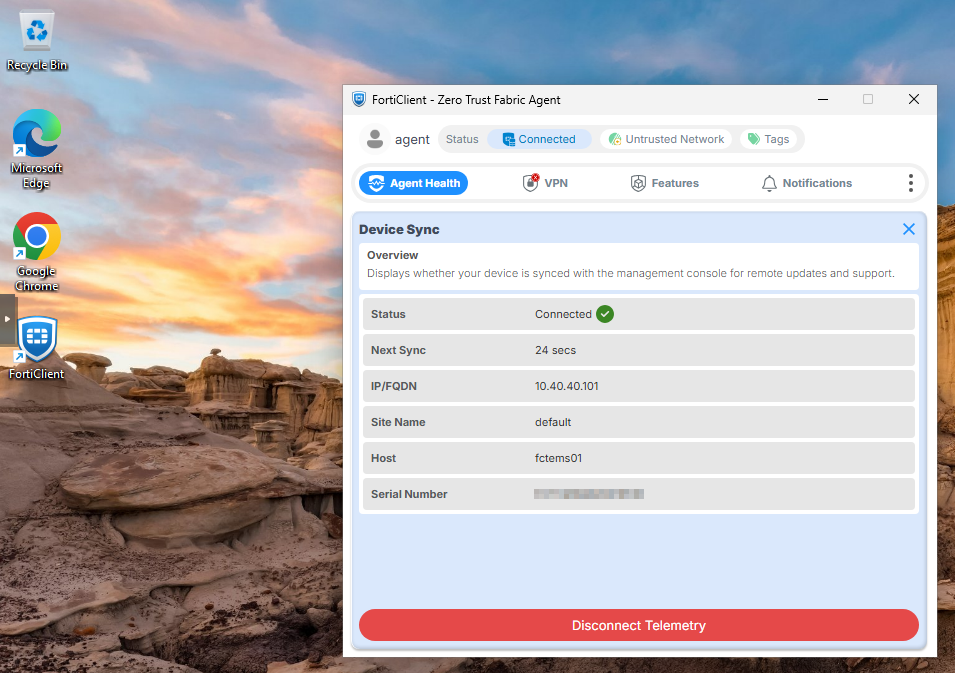
Figure 20. – Screenshot of FortiClient 8.0 running on a test VM, registered to FortiClientEMS
Fixing “Yellow” Cluster Health on a Single Node
Notice in Figure 18 that every index is yellow with a replica count (rep) of 1. FortiClientEMS asks for one replica of each index, which is the right choice for a production cluster. On a single-node lab, though, there is nowhere to put the replica, so the cluster reports yellow. Everything still works, but it is easy to fix:
# Remove the replica from the existing FortiClientEMS indexes
curl --cacert http_ca.crt -u elastic -X PUT "https://<ES_IP>:9200/forticlientems_*/_settings" \
  -H 'Content-Type: application/json' -d '{"index":{"number_of_replicas":0}}'
Figure 21. – Setting replicas to zero on the FortiClientEMS indexes
I also set number_of_replicas to 0 in each of the eight forticlientems_* index templates. That way, new indexes created at rollover inherit the setting. Afterwards:
{"status":"green","active_shards":11,"unassigned_shards":0}Figure 22. – Cluster health after removing replicas
Important Notes: Only do this in a single-node lab. In production, run a multi-node cluster and keep the replicas. Also be aware that an EMS upgrade may rewrite its index templates, in which case new indexes will come back with a replica and the cluster will turn yellow again.
Resource Impact
Since RAM was my main constraint, I kept an eye on memory usage. The Elasticsearch container settled at about 1.3 GiB. What I did not expect was the FortiClientEMS VM itself growing from about 5.9 GiB to 7.3 GiB (of 8 GiB allocated) once the events services started. If you are running EMS near its minimum memory allocation, plan for some extra headroom when you turn on this feature.
An Open Question
For full transparency: I ran both execute import-cert (which adds the CA to the operating system’s trust store) and --es.cert (the documented EMS setting). I have not tested whether either one alone is enough. My expectation is that --es.cert is the one EMS actually uses, but I have not confirmed it.
This is where I would love to hear from you:
- Have you connected the FortiClientEMS VM appliance to Elasticsearch using only
--es.cert, or onlyexecute import-cert? Did it work? - Did you solve the certificate problem a different way, such as giving Elasticsearch a publicly trusted certificate?
- Have you run this integration in production? How did you size and secure your Elasticsearch cluster?
Please share your experience in the comments. I will update this post with what we learn together.
A Note on How This Lab Was Built
As I mentioned at the start, I tried something new with this lab. I used an AI assistant (Claude Code) running in a container on my Proxmox host as my system administrator. I gave it a dedicated Proxmox API token and an SSH key, both of which I can revoke at any time. Before changing anything, it took a read-only inventory of the environment. It then read through the FortiClientEMS documentation, proposed the design options above with their trade-offs, built and tested the Elasticsearch node, and found the bad_certificate error in the Elasticsearch logs.
The part I found most valuable was the collaboration on the troubleshooting. It did not have access to the EMS appliance, so I ran the execute commands and shared the output. It read through them, spotted scp and import-cert as the supported path, and walked me through each step. I approved every change that mattered, and it cleaned up the temporary transfer account when we were finished. It is an interesting way to work, and it may be the subject of a future post.
Summary
Here is the short version for anyone who lands here from a search for that red “Internal Error”:
- Elasticsearch 8.x auto-generates its own CA, and FortiClientEMS will not trust it by default. Look for
bad_certificatein the Elasticsearch log. - The EMS VM appliance has no shell, but
execute scp --readcan pull the CA certificate into/exchange. execute import-cert <file>adds it to the appliance’s trusted CA store. Confirm withexecute list-certs.config set events --es.cert=/exchange/<file>points EMS at it.- On a single-node lab, set replicas to 0 on the
forticlientems_*indexes and templates to get back to green.
If issues persist after all of this checks out, the next best step is to open a ticket with Fortinet TAC.
I hope this helps anyone who wants to try out the All Events feature with the FortiClientEMS VM appliance. As always, please leave a comment below and let me know your thoughts, especially if you can help answer the open question above about import-cert and --es.cert.
Until next time.
This article is based on a lab environment and is not official Fortinet guidance. Please check against the current FortiClientEMS documentation before deploying in production.