
Introduction
It is common to use the FortiGate as a web proxy for enterprise environments. The default behavior of the web-filter is to match traffic based on the layer 4 information and then apply a web-filter profile that enforces web-filtering policy based on its configuration. The matching of the FortiGuard categories happens within the web-filter and not in the firewall policy.
Default Firewall Matching
By default, the FortiGate firewall policy performs matching based on the following criteria:
- Incoming Interface
- Outgoing Interface
- Source
- Address
- User
- Device
- Destination
- Address
- Schedule
- Service
This is indicative by the following following screenshot from the IPv4 Policy WebGUI:

This behavior best serves an environment that can assign a single web-filter to a matching user group where that user group is defined by a certain address, active directory group or device type. Below is an illustrative example from the firewall policy:

As indicated by this screenshot of the policy, the matching rule assigns a corresponding web-filter based on the matching of the corresponding user group. In the example above, the users who are apart of the “fsso_admins” security group are assigned the “wf-admin-profile” web-filter profile. Subsequently, the users who are apart of the “fsso_domain_users” are assigned to the “wf-domain-users” web-filter profile. If a user is part of both the “fsso_admins” and “fsso_domain_users” group, they will be assigned the profiles according to the “fsso_admins” group because it is the first firewall policy rule that will be matched.
To effectively use this policy, it requires planning by the Active Directory administrator to make sure each active directory group has a certain level of permissions assigned to it. This is a suitable solution when there are not a large number of exceptions in the web-filtering policy.
Challenges with Default Matching Behavior
There are a certain set of obstacles that the FortiGate administrator can encounter using the default matching behavior. For example, whenever there are a large amount of exceptions to a particular group policy, a new web-filter must be created to account for those exceptions. To illustrate this point, see the table below:
| User | Group | Allowed Categories | Denied Categories |
| bob | social-media | social-media general | file-sharing social-media |
| mary | streaming | streaming general | social-media file-sharing |
| alice | file-sharing | file-sharing general | social-media streaming |
| mack | file-sharing streaming | file-sharing streaming general | social-media |
Based on the table above, the FortiGate administrator has to create four unique web-filter profiles to accommodate each of these unique FortiGuard categories. Also, the Microsoft Active Directory administrator would need to create four unique security groups to assign users to for matching in the IPv4 policy on the FortiGate. One can see that if there are a large number of exceptions, this method of policy management does not scale. However, this is improved drastically through the use of the transparent proxy.
Enhancing Web-filter Functionality via Transparent Proxy
Historically, the FortiGate has an “explicit proxy” functionality that enhances the default web-filtering behavior of the FortiGate. Although it introduces desirable functionality to enhance web-filtering, it does require explicit configuration on the host to take advantage of this feature. This typically requires the customer to configure their browser to point to the FortiGate as its “proxy” or require an administrator to configure a “PAC” file that auto-configures their users browsers to point to the FortiGate for this feature. This typically prohibits many administrators from using this feature as they want functionality that is “transparent” to the user.
FortiOS 5.6 introduces the “Transparent Proxy” feature. According to the “What’s New in FortiOS 5.6” documentation, the following explanation is provided about the “Transparent Proxy”:
In addition to the Explicit Web Proxy, FortiOS now supports a Transparent web proxy. While it does not have as many features as Explicit Web Proxy, the transparent proxy has the advantage that nothing needs to be done on the user’s system to forward supported web traffic over to the proxy. There is no need to re-configure the browser or publish a PAC file. Everything is transparent to the end user, hence the name. This makes it easier to incorporate new users into a proxy deployment.
You can use the transparent proxy to apply web authentication to HTTP traffic accepted by a firewall policy. In previous versions of FortiOS, web authentication required using the explicit proxy.
Normal FortiOS authentication is IP address based. Users are authenticated according to their IP address and access is allowed or denied based on this IP address. On networks where authentication based on IP address will not work you can use the Transparent Web proxy to apply web authentication that is based on the user’s browser and not on their IP address. This authentication method allows you to identify individual users even if multiple users on your network are connecting to the FortiGate from the same IP address.
https://help.fortinet.com/fos50hlp/56/Content/FortiOS/fortigate-whats-new/Top-Firewall-Transparent-proxy.htm
With the advent of this feature, the Fortigate administrator now has additional functionality to simplify the deployment related to web-filtering policies that contain a large number of exceptions. This is possible due to the ability to add “FortiGuard Categories” as part of the matching criteria in the Proxy policy. Please see the screenshot of policy below to serve as an illustration:

Now that the “FortiGuard Category” is part of the matching criteria, the previous problem of solving a large number of exceptions becomes trivial. The Active Directory administrator can just assign a prospective user to a security group that corresponds to a FortiGuard Web-filter category. This is in lieu of creating a unique Active Directory group for each unique combination of Web-Filter categories. With this new configuration, as the policies are evaluated from the “top-down”, if a user is not a member of the security group that correlates to the FortiGuard category, the FortiGate moves to evaluate the next rule in succession. All rules will be evaluated until the implicit rule is matched (which can either be set to implicit “deny” or “allow”).
Below is an example of the proxy policy configured based on FortiGuard category as part of the matching:

Due to the FortiGuard category matching happening as part of the proxy policy, the action of applying the web-filtering security profile can be set to “monitor” so that the corresponding web-filter logs will be captured.
Pro-Tip: If the admin wants a default deny rule as the last rule evaluated but wants to maintain web-filtering logs associated with those blocks, they can explicitly define a rule and set the web-filter security policy to block all FortiGuard categories. See example below:

Configuring the Transparent Proxy
To configure the FortiGate to use the transparent proxy feature, please follow the procedure below:
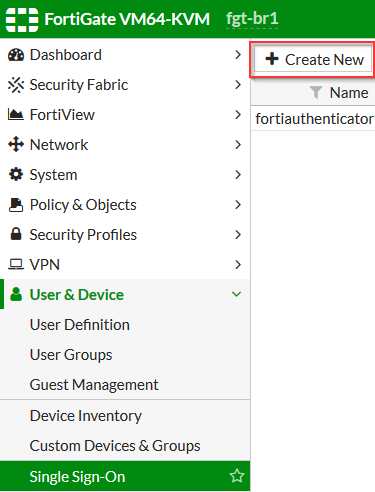
Configure Fortinet Single-Sign On (FSSO)
This article makes the assumption that the FSSO source (i.e. FSSO Collector, FortiAuthenticator) has been configured and is ready for connectivity from the FortiGate. This includes configuring the FSSO to forward the proper groups from active directory to the FortiGate.
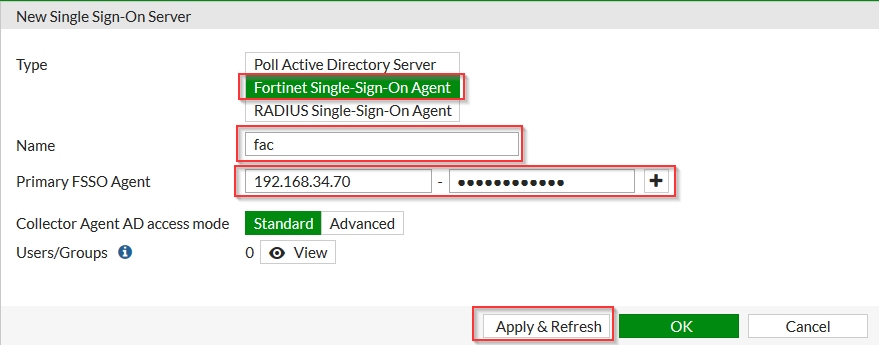
1. “User & Device” | “Single Sign-On”

2. Click “Create New”
3. Choose “Fortinet Single-Sign-On Agent” | Populate the “Name” ; “Primary FSSO Agent” IP(FQDN)/Password | Click “Apply & Refresh”
4. Confirm that the groups are populated from the FSSO source by clicking “View”


5. Confirm the green check-mark under the “Status”

Create FSSO User Groups
- Click “User & Device” | “User Groups”

2. Click “Create New”

3. Type descriptive name in the “Name” field | Select “Fortinet Single Sign-On (FSSO)” as the “type” | Select corresponding AD Group in the “Members” field | Click “OK”

4. Create the remaining groups as required by your policies as shown in the result below:

Configure Authentication Rules
The authentication rules are used to configure the explicit/transparent proxy feature. This step is imperative to ensure correct operation of the proxy rules to correlate a FSSO group with a corresponding rule which references the group.
1. Connect to the CLI of the FortiGate and type the following commands:
config authentication scheme
    edit "authscheme"
        set method fsso
    next
end
config authentication setting
    set sso-auth-scheme "authscheme"
end
config authentication rule
    edit "fsso"
        set srcaddr "all"
        set sso-auth-method "authscheme"
    next
end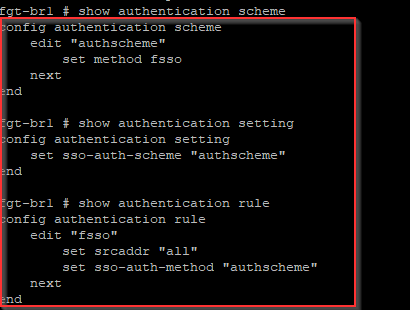
Enabling Proxy Feature
To configure the transparent proxy via the GUI, follow the procedure below:
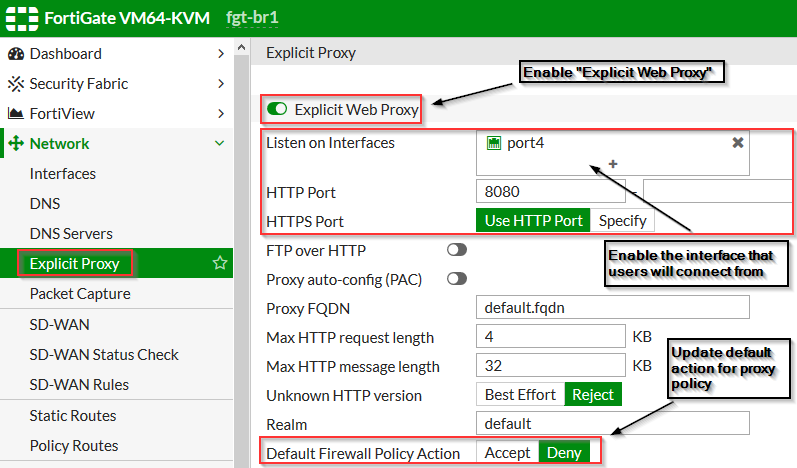
1. Click “System” | Feature Visibility | Enable “Explicit Proxy”

2. Click “Network” | “Explicit Proxy”
3. Configure the settings according to the screenshot below | Click “OK”
Configure FortiGuard Category Address Object
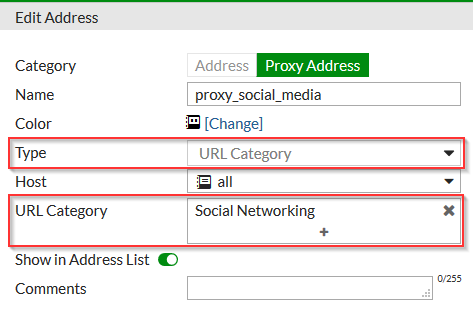
The Proxy Address object provides the facility to use the FortiGuard category within the Proxy Policy as a referenceable object. This allows the FortiGate to use this as the matching criteria in the Proxy rule. To configure the address object, follow the procedure below:
1. Click on “Policy & Objects | Addresses” | Click “Create New”
2. Set the category to “Proxy Address” | Set the “Name” | Set “Type” to “URL Category” | Select “URL Category” | Choose the corresponding URL category for the object

Configure HTTP Redirect to Transparent Proxy
To enable the transparent proxy functionality, an “HTTP Redirect” must be enabled via the “Proxy Options” applied within a policy. This policy should be configured to affect the HTTP and HTTPS traffic as shown in the screenshots below. Please follow the procedure to configure “HTTP Redirect” for the Transparent Proxy within the “IPv4 Policy”:
1. Click “Security Profiles” | “Proxy Options” | “Create New”
2. Set “Name” | Set “Protocol Port Mapping” to HTTP | Enable “HTTP Policy Redirect”

3. Click on “Policy & Objects” | “IPv4 Policy” | “Create New”
4. Create an IPv4 policy that reflects the settings shown in the screenshot below:

This policy should be evaluated for web related traffic prior to other rules to allow it to be used for this type of traffic. The resultant policy should show as follows:

Configure Transparent Proxy Policy
Once the FortiGate has been configured to redirect traffic to the transparent proxy, policies can be created using the “Proxy Policy” section of the GUI. This enables the administrator to use proxy related address objects and services as well as the flexible authentication method defined earlier in this document. To test this method, you can create a policy to support these settings following the instructions below:
1. Click “Policy & Objects” | “Proxy Policy” | “Create New”
2. Set the policy to reflect the settings annotated in the screenshot below:

This policy can be replicated to reflect multiple groups and multiple address objects that reference specific FortiGuard categories as shown in the screenshot below:

Web-filter Behavior Validation
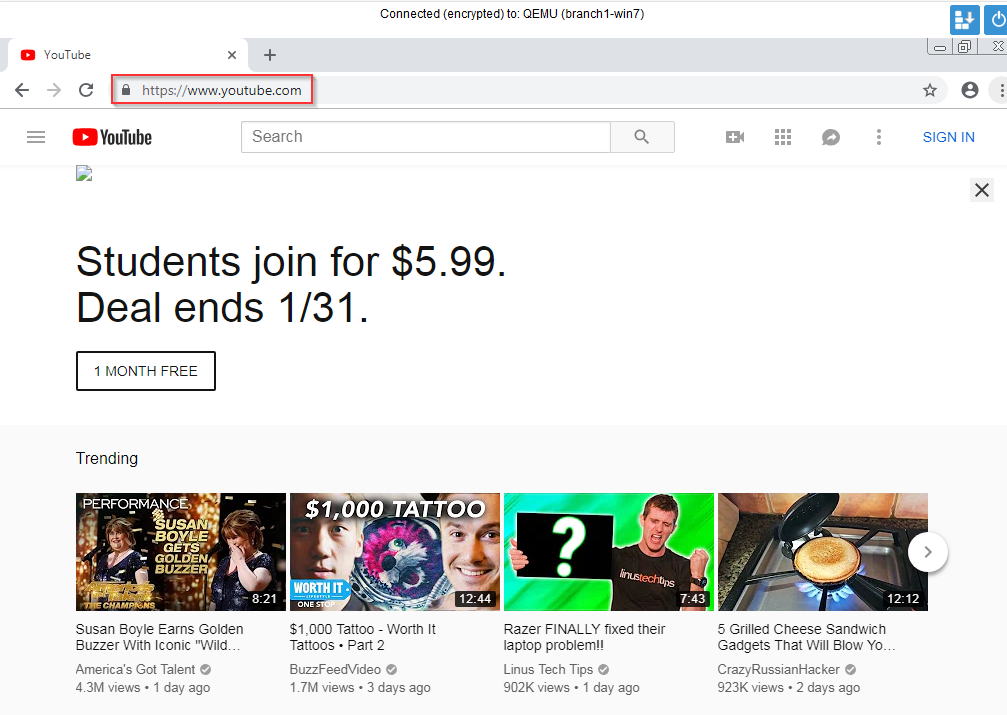
Once the configuration has been completed, the user should be able to validate the correct operation of this functionality. Below is a screenshot of a test case where the user is accessing YouTube which is categorized as “Streaming” according to FortiGuard:
It is confirmed from the “Monitor | Firewall User Monitor” section that the user is tied to a specific group upon accessing the website. It is important to enable “Show all FSSO Logons” so that the logons associated with the transparent authentication is displayed.

This can also be confirmed via the CLI command:
diagnose wad user list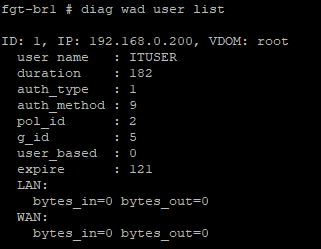
The output from this command contains the following fields:
| Field Name | Description |
| IP | IP address of the user |
| user name | The username (cn) of the user |
| duration | The amount of time the user has been tracked by the transparent proxy |
| pol_id | ID of the proxy policy that matches this traffic |
| expire | Timeout of when the transparent proxy will remove this entry from its tracking list |
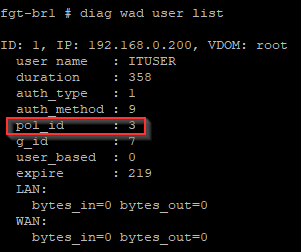
Once the same user attempts to access the a different category through the FortiGate, it should allow access as long as the category is allowed via policy.

The FortiGate “Monitor | Firewall User” list shows that the user has been recategorized to the firewall directory group that is mapped to the “File Sharing” category.

The user continues to exist via the CLI but the policy id has been changed to reflect the ID of the proxy policy that corresponds to the rule that the new session matches.
As you can see, this greatly enhances the flexibility of the web-filtering capabilities on the FortiGate. This will likely allow you to migrate policies from other vendors directly to the FortiGate without any additional conversions.
Comment below on your thoughts with the methodology covered in this article.
Hi Jonathan, this is the best article I’ve read for a long time and should become part of the standard fortigate admin guide.
Hi Patrick,
Thank you for checking out my blog and providing your feedback.
I appreciate that compliment. I try to put in a lot of effort to create something that is useful to people who have to solve these problems. Hopefully you will continue to come back and share this with your network.
Thanks for stopping by!
Jonathan,
This is some REALLY great content – you should be very proud! Fortinet could learn a thing or two from you on creating functional, compelling content related to their products. I learned more about configuring various proxy options than I did reading Fortinet’s own documentation!
Hello Jonathan,
I can use this with kerberos authentication?
Sorry for the late response.
I am not sure, I have never tested this with Kerberos authentication.